You didn't really think you were going to get ALL PUNCH ART after a scrapping weekend, did you?
I won't make you look at ALL the 20+ layouts I finished last weekend- but I will be throwing some of them up here.
Today's "Lesson in Scrapbooking" - (said like I am some kind of expert - try not to laugh TOO hard) is...
Casing yourself.
First layout of the weekend was of my grand nephew and I thought it was precious (with a baby this cute - how could it be anything else?)
By the way, he cut his first tooth this week - right as I was making One Tooth Baby - we must have some deep connection - Mr. Darling Luke and his favorite Aunt Ellen.
******
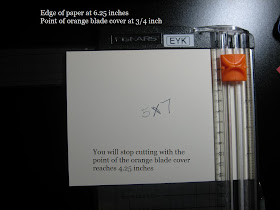
This open frame is SO EASY to make with your SU paper trimmer!
See the ruler on the metal?
See the ruler on the clear bar/arm that goes over your paper?
See the little pointy bumps on the orange blade cover?
If you can see those things you can make a frame!
(directions at end of post for the convenience of those that don't care)
I liked it so much that later the same day I repeated the frame thing in different colors for The Over Educated Waitress (formerly known as college girl - and these photos would have been during those college years)
See the texture behind this photo? I didn't have my texture plates (can't take everything - it won't fit in the car) and the paper was too big for an embossing folder - so I pulled out my trusty crimper and ran the mat through that, turned it 90 degrees and ran it though the crimper a second time. Great texture from a tool I sometimes forget about!
And you know I REALLY liked this frame thing because I used the same idea on this layout too...
On this one I put the frame element open AND another one around a vellum quote. Perfect solution for adhering vellum because no matter how many adhesives I've tried - I can still see the "glue".
This paper is the "blah" side of the Blueberry Crisp DSP in the current catalog. I thought it was perfect for a manly page.
I happened to use a "pre-made" vellum quote I had in my stash - but you can run vellum through your printer and use any quote or use this spot for your title or journaling.
Now - for those of you who need a tutorial for the frame.
Determine your OUTSIDE measurements for your frame and cut a square or rectangle that size.
Determine how wide you want your frame to be (I think these were 3/4 inch)
Let's use 5x7 for our "sample" project and a 3/4 inch wide frame.
Seen separately you probably would never notice these are all the same idea - the subject, colors and paper changes allowed me to use the design over and over without it seeming too repetitive.
The moral of the story is:
When you create something you really like -
CASE YOURSELF!


So freakin' awesome! Love all the pages.
ReplyDeleteAwesome! You know I love to see your scrapbooking pages! Keep em coming, they always inspire me to scrapbook.
ReplyDeleteSo glad you had a good time and got so much accomplished.
hugs,