Showing posts with label tutorials. Show all posts

Thursday, August 19, 2010

Famous Feline (yep, another one)

Time for another famous kitty.

I've done Garfield, Felix, and Pink Panther but a request from Marisol of  A Touch of Sol  asking if I had ever done anything from Dr. Seuss led to this... 

Now, don't go "googling" Cat in the Hat images  - you'll be disappointed in me because I am missing some parts. 

His face isn't exactly right,  I didn't include his ear or mouth - but I was given some advice to "keep it simple and clean and don't drive yourself crazy" so... he is what he is.

And since I think you will like him even with his flaws, I prepared some "how to" photos.

Punch List
1 inch circle
large oval
small oval
word window
heart to heart
circle from itty bitty punch pack  (If you don't have this yet -you can use the tip of the word window)

Hat and Bow-tie first:
Neck is half of a word window (sponge with gray ink)
Bow tie is two narrow Heart to Hearts, one small Heart to Heart and the circle from the itty bitty punch pack
I recommend outlining each of these pieces with a black marker

Hat brim is a small oval punched next to a small oval hole (outline in black)
Support pieces to assemble hat - 2 word windows (can be any color)
Hat parts are three red and two white -1 inch circle punches - trim "flattish" on each side - in the photo below I show one of these on a green circle so you can see what I mean - the cuts don't need to be perfectly straight, even or exactly parallel - just relax and cut. (outline in black)
 This photo show hat assembly in progress - I just ran adhesive down the word windows and overlapped each circle part slightly.
Next the face:
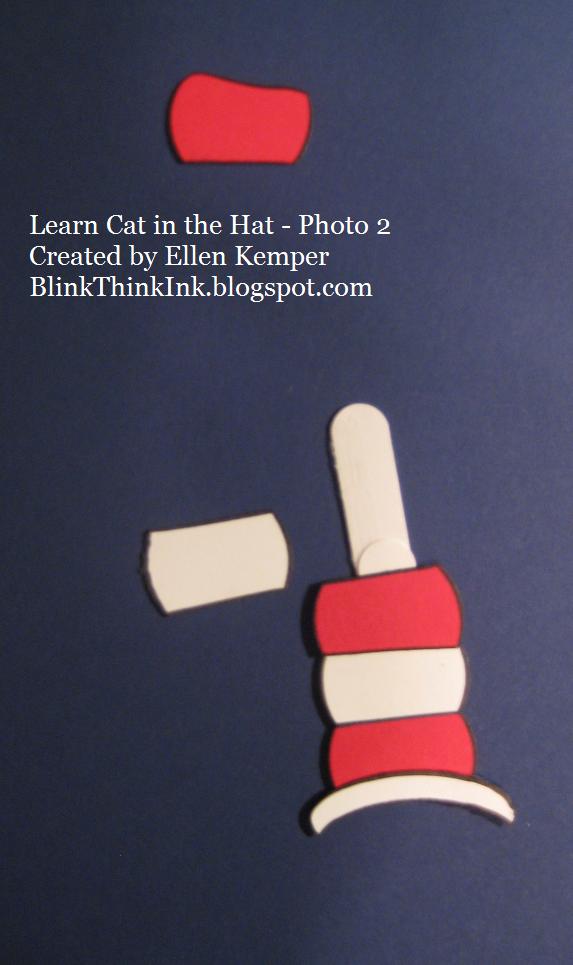
One Large oval and one small oval
Overlap the ovals as shown - trim off the excess on the left side of the small oval.
Add some gray sponging and outline in black (outline AFTER assembly - you don't want a line all the way around the small oval)
Now the eyes:
Punch 2 circles from the itty bitty punch pack
Stick them on the sticky part of a post-it note
Repunch as shown in the photo below.
 Remove from post-it and outline in black.
Add a little "u" shape in his eyes with a fine tip maker.
Snip a TINY bit with your circle punch at the corner of a black scrap paper for his nose - this will need to be adhered with glue pen (too small for my preferred mini glue dots)
And that is all I have to say
He's ready for a day of play

Alas, there's no more silly rhyme
Because this girl's run out of time

Monday, July 5, 2010

How to Build a Hippie

No, you aren't using wood planks to build him - that is the faux wood technique taught on VC Rocks this year by Brandy Campbell.  See what you missed if you didn't join VC Rocks this year?   This pose is the lazy punchers hippie - you avoid having to do his legs and feet - and you can easily give him a protest sign to display your sentiment.

FULL hippie directions follow:

I'll throw up the photos and a few tips - you'll get it!   Parts you need are shown above - you don't really need the wide heart to heart - but you do need to punch twice offset from that hole to get his arms.  The headband is just a scrap of orange.  The round white ring is the 1 inch circle punched around a 3/4 inch circle HOLE.

Then you have to modify some of these parts - I didn't show the modern label before punching hands out - but the rest of the "parts" that need to be altered are shown PUNCHED and then MODIFIED (photo below)

Snowflake trimmed down

Word Window repunched for nose

Modern label punched with 1/2 circle for hands

Modern label trimmed to slant then knees rounded

Word window - cut ends for glasses

Word window - fold in half - trim toes by hand - cut apart (this way your toes are identical for both feet)

Scallop oval - repunched for beard and bangs - TIP: slide in at the "corner" of the scallop oval for bangs - if you stick in straight in for the tip - you won't get the shape you want.

Small oval - cut in half for sleeves


Now you can see how he takes shape.  Marker for eyes and earpiece of glasses.  Tip: attach middle of peace sign at the bottom, then at the top, THEN trim off the extra snowflake at the top.  Heels don't matter because they are hidden by jeans.
He will look weird in the face until you get the nose on - don't worry - just keep on sticking his parts on.
I use SU Mini glue dots for assembly.  If a piece is small I simply roll the glue dot up to a thin line (wad) of sticky.

So just follow the pictures EXCEPT make sure your peace sign is turned the correct directions (some idiot, named me, nearly messed this up)

Thursday, June 24, 2010

Wino Kitty How To

You all had several clever ideas for the wino cat card that made me chuckle so I made another cat and snapped a photo for the how to.


Left columns shows punches and right column shows what  each one looks like after you follow my directions below.

Head - large oval - using temporary adhesive (dotto) stick on a scrap and reinsert into large oval punch moving so that you are snipping just a little off horizontally (see photo)

Body - word window - with scissors snip diagonally on both sides (see photo)

Ears - small  Heart to Heart (2)

Hind legs - narrow Heart to Heart - trimmed with scissors (see photo)

Arms - wide Heart to Heart - punched next to hole and then again to get the narrow arms

Feet aren't shown in photo - small Heart to Heart cut in 1/2

Collar - Chain link - which is the word window punched around the slot punch hole - then repunched with the word window. - but since I stuck in up so close under the head - you could just use a strip of paper.

Cat was punched from whisper white and sponged with soft suede
Face and claws drawn on with thin marker

Wine glass from Cheers to You.

And here is a Super Bowl Trophy - which is what the cat looks like when all you have done is stick the head on the body.

Friday, January 8, 2010

More White Beards - Get your Grump On


For my "get well basket" project using Grumpy, I decided to include some pain reliever 'for when you are feeling Grumpy'.  I picked up a little sample size pack at the drugstore check out and cleverly attached it to a little card like this:

A slot punch and ribbon - a very low tech solution.
Used red sticky strip to secure this flap to the card base
See photo below:


Here is the scoop on making Grumpy...


Click to see the photo larger and read the words

Chocolate Chip - wide oval (not the large oval shown in the photo), HOLE from a large oval punched with a wide oval to get the hat edge

Blush Blossom - 1 inch circle, leaf from Two Step Bird, Small Oval

White - two Scallop Oval, re-punch one of them as shown, smallest heart from Heart to Heart

Black - two standard hole punch, HOLE from narrow heart in Heart to Heart -->>  move punch up from the hole and punch to get the narrow sliver for eyebrows, toss the black heart and scrap shown in the photo

Sponge Bravo Burgundy ink around the nose
Place the black of the eye at the TOP of the heart - add white highlight with gel pen
Layer beard parts as shown


Almost assembled but gosh, he doesn't look Grumpy yet!  That is because the EYEBROWS are the key to his personality.


 NOW he is grumpy!

Nose is popped up on a dimensional.

I like Grumpy - he may be my fave of the punched dwarfs - I just don't want to look or act like him.  But I guess keeping those eyebrows plucked would make anyone grumpy.  (grin)


Thursday, January 7, 2010

More White Beards - Just what the Doc ordered

Woo hoo!  Back to PUNCH ART today!

I know some of you were disappointed that the blog focus wasn't punch stuff the past few days - but giving you all that scrapbook yakking (a class I had already prepared for something else) gave me
  • time to spend with college girl (she left yesterday afternoon)
  • AND gave me time to work up some new punch stuff,
  • AND hopefully helped the three of you who actually read through ALL those words!
This dwarf project is moving slowly, not because I don't WANT to show you, but because my "cleverness"  only relates to punching stuff NOT finishing projects.

I finally came up with a way to use Doc.  (Remember, I'm trying to use the dwarfs in unique ways to make a "get well" basket...)


What do you think?  Will that work? Oh, who cares! - you just came for the tutorial anyway, right? (grin)

Here is a "how to" for Doc.

  • More Mustard - full heart (trimmed with scissors) and large oval HOLE punched with wide oval
  • Blush Blossom - 1 inch circle, 1/2 inch circle, small oval
  • Basic Black - two standard hole punch
  • Vellum, sponged with bashful blue - two standard hole punch
  • White - smallest heart in Heart to Heart


Click on the photo in order to read the words

Add pen marks for folds on hat, eyebrows, glasses "ear pieces"
MAKE SURE you get your black eyes CLOSE (as in overlapping) because the glasses will go on the outside of the black parts.  Add white highlight with gel pen.
I sponged just a little bravo burgundy on the top of his nose.


To attach the glasses - I rolled up a mini glue dot and stuck that wad at the bottom of his eyes - so your glasses are just attached at the very bottom of the 'lens'.  This glue wad will show a little bit now but will be covered by his cheeks and nose.


I drew on a smile but it is not noticeable with the nose attached so you can skip that if you want.

 
You might notice my "fold" lines are a bit thick on the right Doc - I opened the wrong end of my stampin' write journal pen.  Oops!

I have "ideas" for most of the dwarfs - I just have to execute them. (Execute: To perform or carry out what is required  i.e., make the projects NOT execute- as in kill the dwarfs).

But I need HELP on one.  I'm struggling with a way to use Bashful in the basket.  The best I've got so far is putting him on a card and saying "Don't be Bashful, call me if you need anything".   Any better ideas out there? 


Friday, January 1, 2010

Welcome 2010!

Happy New Year!

I hope 2010 is a wonderful joyous year for you. 

May you you find everything you need and a few of the things you want. 

May the sun shine bright for you, unless you really like snow and then I hope flakes fill your life.


I realize that unless you are scrapbooking a New Year event this comes a little late for you to use.  However, you might save the idea for next year or you might need to make a baby without the hat and banner so here is a tutorial.  (See me trying to start the year as a helpful blogger?)

You need these punches:

Blush blossom:
two 1.25 circle punches
two medium hearts from Heart to Heart
one large heart from Heart to Heart
two small hearts from Heart to Heart
one standard hole punch

White: 
one Small Heart (new, available Jan 5)
scrap with large oval punched on the edge

Black: 
two standard hole punch

Chocolate Chip (or other hair color):
scrap with standard hole punched from the corner


Insert the two medium (wide) hearts into a 1/2 inch circle punch - this is making the legs/feet


Punch the 1/2 inch circle punch around the hole in the chocolate chip paper to get a curl - turn you punch over and look at what you are punching

Punch a 1 3/8 circle punch over the oval hole in the white scrap to get a moon shape

Cut the large narrow heart in half as show below...


Take the white moon shaped diaper and slip it into a circle punch just a tiny bit to punch two leg openings


The punch pieces shown below are what you will need for assembly...


Here is a RARE photo - I am letting you see the back of one of my creations - so you can see the assembly - very easy but looks messy since I ran out of mini glue dots and used another type from my stash.  Can't wait until my order gets here with a HUGE supply of mini glue dots!


Almost done


Add pen/marker mouth and navel


If  you need the hat directions:

start with a scrap of black shaped like this, a small oval hole in blue paper and a large black oval.


Slip the wide end of your black scrap into an oval punch (insert from the center of the punch - just putting one edge in)  to round the top of your hat,
Punch an oval offset from your hole to get a blue curved strip

Below you see the hat forming

snip off the excess hat band

Add some highlights if you want and you have a new years baby


If you want the banner I showed at the top of this entry - it is cut freehand - sorry, SU only gives me a certain number of punches to work with. 

I'm trying for Helpful Teacher not Miracle Worker....


I think he is pretty cute and I hope you can find a way to use him.

Monday, December 28, 2009

More White Beards - Sneezy

I am not good on sending get well cards.  I have good intentions but by the time I get around to making the card AND getting it mailed... friends have long since recovered.  The solution?  Have some cards ready to use.  Yeah, I know, you have probably been doing that for years but sometimes I'm a little behind in the smart department.

But now that I have some cute little dwarfs punched (with names like Sneezy and Doc) I think I can get excited about have those get well cards ready to roll.

But I'm not in the card mood today so I have to do something else.  I think I'm going to make a basket of dwarf themed things to drop off when someone is under the weather.  And the first is :  "For when you are Sneezy"


Here is the how to for Sneezy


Hat - large oval and 1/2 large oval hole in apricot appeal
Face - 1.25 circle. large oval, heart to heart and leaf from Two Step Bird in blush blossom
Eyes - small heart in white, standard hole punch in black
Beard - circle scallop
NOTE  = Small Heart and Two Step Bird are available from SU on January 5
Trim as shown below:
(use wide oval to trim around 1/2 large oval hole)

Sponge with bravo burgundy and add a couple of pen lines as shown


I have ideas for some of our other dwarfs - but college girl is still in town - will post soon

Thursday, December 3, 2009

Sailing away from Santa - filling a request

This blog has been consumed with Santa stuff for a couple of weeks so for today I am putting holiday stuff on hold and passing on info and filling a request.

INFO:  Way back in the early days of the blog I linked you to a puncher named Jill S when I copied her M&M idea but didn't have enough info to fully give her credit.  Now, I do!  She is Jill Shover and she is still creating.  She doesn't blog but she has updated her punch creations recently so go check out this link  Jill's fabulous stuff .  Each entry has more than one page so check it all out!

REQUEST: One of my VC_Rocks buddies, Brandy, emailed me requesting a "decent sailboat".  Well, I don't know if this boat is "decent" but I'm pretty sure it isn't indecent!


Can you believe this is from the Wide Oval punch and about three snips with scissors?  Well, it is! (with one thin black strip from the trimmer)  I honestly didn't know I could create something will less than 3 punches!

So Brandy - here  is a pictorial tutorial just for you, although we will let these other ladies see it too.  It is just  photos of the sail on scrap paper but I think it is all the help you will need.  Don't make Gail keep reminding you about my blog - I expect you to read regularly now! 

All WIDE OVAL punching here: 
1/2 an oval

match the top "corner" of the hole to the edge of the punch - push in "kinda diagonally"


This is what you get


Punch a "piece" of oval off the bottom


This shows all the punches you have made:

Now punch one more oval piece jutting top left from the "hole" you already have


take your scissors and trim down from the "corners"


You will toss the bits on the top right in the next  photo and place your "sails" as shown here


The rest of the boat should be easy to figure out!