Wednesday, July 21, 2010

Strong Man


Same as the Italian Man in previous post, adding body and props.

I stuck the far ends of his "bat hair" into a small circle (1/2 inch probably) punch to round off the tips.
Groomed his moustache.
Left the whole owl as his belly  - feet cut off (of course)
Used the owl upside down for his feet and pants - just slipped the owl into the word window to separate his legs.

Sleeves and Arms - the usual small oval and wide heart to heart
Hand - the usual modern label tips punched with a circle punch
Weights - strip from trimmer and 1 inch circle punch


Won't your guy be pleased when you use the "Strong Man" on a card for him?:
Flattery might get you dinner out!

Italian Man

Don't ask me why I think of this as an "Italian Man" because there are so many other things I could have called him.  Dark curly hair and I come up with Italian.  I have no explanation.  I have no clue.


He is made from the OWL punch and the BAT punch assisted by the 1/2 inch circle.

WHAT?  you don't believe me?  Well, look here:


Just snip off the bat head and feet with the 1/2 inch circle punch to get his hair
Use the larger owl circles for his ears, one of the next smaller for his nose.
Use the vest/breast of the owl for his neck
Make a small "v" in the owl head and use that for his shirt
Punch the smaller circle in black then reinsert into the owl punch and put that HOLE by the larger circle - punch to get mustache.
Draw on eyes and eyebrows with black marker.

Yep - it is just that easy.

Tuesday, July 20, 2010

Monday, July 19, 2010

Jackie is a Genius! (but we knew that)

Check this out - Jackie Topa (genius puncher) make the cutest moose from the new owl and bat punches!

Look HERE

The Owl Punch is a Girl!

Stampin' Up! really hit the jackpot with the new Owl punch.  I have seen cute cute cute owls made with it.

But you know me - I can't just use punches as they were intended.  I must turn them upside down and cut them in half and repunch them and think odd thoughts so that you can get even more use from your punches.

As soon as I saw an image of this punch - long before I held it in my hands I saw the first "odd usage" and it is.... HAIR

This girls is from three punches, scissors and three little curved lines from a black marker
You need:
The owl punch, the 3/4 inch circle and the 1 inch circle.
Hair color, flesh color and dress color cardstock.

She is really a very small character - here she is with the 1 inch circle punch so you can judge the size
I almost named her Polly Pocket because she is so small that the bottom half of her fits in the new petal punch envelope thingie - whatever you call it  (don't have the new catalog memorized yet)

Hair is the owl punch upside down with the feet cut off
Bangs 1 inch circle on edge of paper
Face - 3/4 inch circle
Neck, arms, legs - 1 inch circle around 3/4 inch circle HOLE - cut this ring into 5 pieces to make these body parts
Headband - 1 inch circle around 3/4 inch circle Hole - use about half of this ring for her headband
Hands - owl feet
Dress - vest/breast from the owl punch
Shoes - heart from owl punch cut in half

Draw on three curved lines for her eyes and mouth - EASY PEASY!

Jackie Topa has already made a tulip from the owl punch.  Wonder what else will be discovered?

Sunday, July 18, 2010

I Paws'd Here

I think I've shown this mutt at least twice before - but I really like the way I used him on a bookmark for a swap - so you have to see him again.

Wording was computer generated and the paw print came from D is for Dog.

Saturday, July 17, 2010

More than Tall Tales


Artistic License used here - since I do know that the giraffe should have the spots not the background.  I liked it better this way.  And no, you don't get to see the reject.

Face - large oval - trimmed in on both sides at "bottom" with scissors
Neck - word window
Ears - 1/2 inch circle, cut flat on one side
Horns - smallest my way arrow, snipped the point on three sides to flatten
Eyelids - circle from itty bitty shapes punch pack, cut flat on one side
Eyes - standard hole punch in early espresso
Drew on nostrils and drew a line at the bottom of the eyelids with marker

Background technique is wax paper resist but not on glossy paper - I did it on very vanilla cardstock.
And in the past I have always wadded up my wax paper - this time I ran it through the Big Shot with a texture plate - this particular plate was a gift from a customer and is not from Stampin' Up!

If this giraffe looks a little more serious than my usual punch art - it is because I was looking at a photo of a REAL giraffe to make it.  Took these photos back in May when the Dallas Zoo opened a new exhibit.  You can actually feed lettuce to the giraffes!  How cool is that?


Friday, July 16, 2010

And now for some business....

First order of business

By RANDOM pulling a name from a hat (actually numbering the correct answers and letting kiddo pick a number at random)  The winner of some surprise punch art is Carol Benson. And I do know how to get in touch with Carol so she will get a little "something" in her mail box next week!


Did you all like the "name that punch" game? 

I think we will try it again.

Someday.

Other Business:

VC Rocks will be having another blog hop tomorrow - LOTS of ladies playing this time - but not me. 

WILD AND CRAZY around here this week as we move FIL back to his old house and move one of the grand-kids and her family in to help him.

So I am not officially on the hop - 'cause I don't know if I'll have anything to post.  But check it out tomorrow if you have time.  It will start at the main VC Blog - Here

Boogie Babes


My good buddy Carolyn Sharkas and one of her friends, Amy (I think) used my Disco Babe for these cards.  Aren't they awesome?  Disco Ball - the lighted floor - the pattern on the skirt - they took her to the next level. 

Doesn't this make you want to "boogie"?

Thursday, July 15, 2010

Great Guesses!

You ladies were very creative with your guessing - and prove that there are PLENTY of options for creating punch characters!


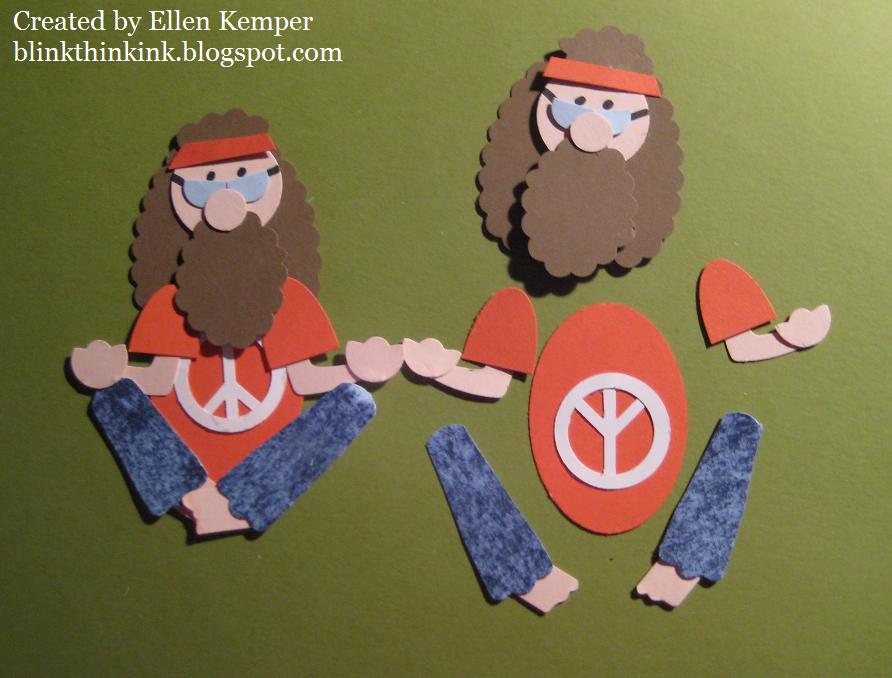
Here is the list of punches I actually used.

Girl in Yellow

Hair - Scallop Oval – (3 of them)

Bangs - 1 3/8 inch circle punched on edge of paper then snipped with tip of large star

Headband – 1 3/8 inch circle next to wide oval HOLE

Sun glasses - ¾ inch circle punched on edge of paper (2 of them)

Head – 1 3/8 inch circle (same for both girls)

Lips – modern label HOLE punched with circle from itty bitty shapes (same for both girls)

Neck – word window (same for both girls)

Chest/flesh part – large oval (same for both girls)

Arms – word window repunched with word window to shorten (4 of these)

Chest/dress part – Full heart punched with ¾ inch square (this it the RETIRED punch I used)

Dress bottom – wide oval

Girl in Red

Hair - 1.75 inch circle in back AND 1.75 inch circle around 1 3/8 inch circle HOLE for front

Bangs- 1 3/8 inch circle repunched with 1 3/8 inch circle

Eye – small circle itty bitty shapes on edge of paper

Head – 1 3/8 inch circle (same for both girls)

Lips – modern label HOLE punched with circle from itty bitty shapes  (same for both girls)

Neck – word window (same for both girls)

Chest/flesh part – large oval (same for both girls)

Arms –word window for upper arms (2) AND word window repunched with word window to shorten for forearms (2)

Chest/dress part – Full heart punched with word window for neckline

Dress bottom – Full Heart

Makes sense now that you KNOW them, huh?

AND our RANDOMLY drawn winner (from all the correct answers received by the deadline) will be announced in TOMORROWS POST.  Sure hope you left me a way to contact you, if you didn't, I'll just draw another name.

Wednesday, July 14, 2010

Name that Punch

Here are two characters made ENTIRELY of punches.  No markers, no sponges, no ink, no scissors.  Purely Stampin' Up! Punches and Mini Glue Dots.

Today we are playing NAME THAT PUNCH. 

I want to see if you can list the punches used to make these 2 ladies - but only ONE part of one character per reader.  That is right - try to guess a correct punch for a body part that has not already been listed.  If it takes TWO punches to make a body part - just list ONE of them.

For example - yesterday's shoes took two punches so "small oval - shoes" (this would be one readers comment) AND "curly label - shoes" (another readers comment)

Another example - If I had used snowflakes to make both characters legs  - one reader could say Snowflake - Yellow girl - Leg and another reader could say Snowflake - Red girl - Leg.

And if we run out of details just tell me how much you appreciate me.  (Flattery is welcome and encouraged)

All correct guesses or flattery (submitted by midnight Central time TODAY) will be thrown in a hat and I'll send the random winner some punch art (not these girls- but some surprise) so leave me a way to contact you.

Emails can be left  in this form "ellen dot kemper at sbcglobal dot net" if you are paranoid about leaving your email address. 

RULE: Flattery will not count until ALL the punches have been guessed correctly so if you are some of the first to comment -you better be guessing punches. 

This could be wild and crazy and confusing - or maybe just boring - don't know until we try it.

Hint - only one punch is retired.  All are from Stampin' Up!

Tuesday, July 13, 2010

Disco Babe


So, if my hippies and the 60s were not your "era" - how about the 70s?

Platform shoes are small oval hole - then the small end of the curly label punch - then snip to thin out your heel.

'Fro is the scallop circle, repunched TWICE.  To repunch, stick it on a post it note - this will give you something to hang on to while you position it slightly off in your punch.

Monday, July 12, 2010

U are on My Mind

This weeks challenge on VC Rocks is to create a punch art animal or bird.

 Duh? 

Did anyone think I'd skip this challenge?

 I didn't think so!


Plenty of punched penguins out there - I have even done a dancing one before - but this is what the Inspiration Fairy sent me, so this is what you get.

White face is butterfly punch repunched with small oval (all this just to get that little indent above his eyes) - draw eyes
White belly is 1 3/8 inch circle - add sponging for shadow
Black head - large oval
Black wings - small ovals
Feet  - scallop square repunched with 3/4 inch circle
Beak - small oval - repunched one end with a circle for part nearest his face (draw a line and outline in black)

For "ice burgs" - large ovals - draw on crooked line - crookedly trim bottom - draw lines to connect - sponge slightly

For "U" - 3/4 inch square - rounded corners by poking in the middle of a 1/2 inch circle (couldn't hold onto it and get it in the normal corner rounder) - Stamped with U from Just Perfect Alpha -  finish off like the "ice burgs"

This was inspired by some clipart I saw - with the sentiment "You are on my Mind" but their penquin had an octopus on his head.   Feel free to try that - but the ice cube is much easier!

Friday, July 9, 2010

On the Blog...

Feeling a bit under the weather this week so no punch art for today.

But I still have something fun for you.

You "google reader" people never see this because it is in the right hand column of the blog right above the search box. 

I found a site someone very clever set up to play with color combinations for all the Stampin' Up! colors.

This is uber fun since the color renovation has shaken things up!

You can submit color combinations you like.

You can vote on combinations that others have submitted.

So actually LOOK ON MY BLOG in the right hand column and see "play with  SU color combinations" click on the link and have some fun.

Thursday, July 8, 2010

Inchworm, inchworm, measuring the marigolds...

Inchworm, inchworm,
Measuring the marigolds
Seems to me, you'd stop and see  
How beautiful they are.
(Song brought to you by my weird memory bank and some Hans Christian Anderson thing that I saw in the far distant past - ummmm, I'm guessing 45 years ago.)

That bean shape body is a wide oval next to a wide oval hole
Ring that becomes his arms is a 1 3/8 circle around a 1 inch circle hole
Head is ornament punch - inserted into the 1.25 circle so that the pointy chin does NOT get punched off
Trimmed a little dip into his face on one side with scissors.
Feet are the small Heart to Heart trimmed
Hands are tips of modern label punched with the end of the word window
Eyes are the new circle from itty bitty shapes

This is how he comes together.
Sponge all pieces of wild wasabi with wild wasabi ink - He will not look as good without it
Outline all pieces in black and draw on the details (as in the photo)
The photo (above) shows some shaded and outlined but some not - so you can see that YOU NEED TO DO IT


His "antenna" are drawn on the ruler -
or since I'm not sure worms really have antenna, I left them off on the right.
Ruler actually measures 4 x 1.5 inches and is So Saffron sponged in So Saffron and outlined in black.  Marker details added

This little guy was the prize for the first 5 swaps received in an "Inch and a Pinch" swap I hosted recently.  I think I left the eyebrows off the ones I mailed out so girls - grab a thin black marker and draw on two little lines for eyebrows- he looks better with them on!

Wednesday, July 7, 2010

Adhesive Answers and Tease

I have received 3 emails this week asking what adhesives to use for punch art.  I have already responded to these sweet ladies but I'm guessing that there might be more of you out there that are wondering but haven't asked the question.

I use Stampin' Up!'s MINI GLUE DOTS for 99% of my punch art.

I love those rascals and buy a dozen boxes at a time.  And when I get down to the last four boxes I place an order because I CANNOT LIVE WITHOUT THEM. 

OK, maybe I could still breath and my heart would still beat, but I'd be a very unhappy puncher.

If something is too narrow for the mini glue dot - I just take my stubby little finger and roll the dot up to a narrow wad of adhesive.  I'm tellin' ya - this works for most things.

When I get really detailed and have a tiny piece (maybe an earring or belt loop) I will bring out my glue pen.

I throw my punch characters in a box (don't worry, they party happily in there) or leave them piled on my desk for weeks at a time - They are treated roughly and they stay put together.  Glue Dots are WONDERFUL and I think you should place an order today.  (With me, if you'd like.)

And the tease is.... Stampin' Up! is bringing out even MORE new punches.  YES!  It is true!! 

I took a peek at the new Holiday Mini Catalog (coming in September) and saw new punches.  PLURAL!!!!!! 

Not a new punch - new PUNCHES.  Isn't that AWESOME? 

We just got new punches with the new big catalog and now we will be getting more...

Think hubby will add a room onto the house for me?

Most Requested Punch Art

I continue to get frequent requests to finish the tutorials for the 7 Dwarfs.

I don't wanna.

The fun for me in all this is the creating not the explaining.

I have showed you Sneezy, Doc and Grumpy so I won't do separate posts for the other 4 dwarfs (boring) but I will give you some tips so you can go it on your own from the photo.

Happy is similar to Doc
leave off the glasses
add tiny scraps of white for eyebrows instead of pen marks
draw open happy mouth
eyes are pieces of big heart from Heart to Heart punch - snip off to get shape AND you will have to slim them down - making them more narrow - blacks of the eyes are just drawn on with pen/marker

Bashful is similar to Happy (above)
Beard is the same scallop oval but you don't need to trim it - just turn it lengthwise
Eyes should be trimmed even more narrow than Happy and add eyelashes, pen/marker eyebrows and mouth
I also flattened out the top of his nose with scissors

Sleepy has Sneezy's hat but the face is like Bashful (above)
except I flattened the bottom (instead of the top) of the nose
Make the eyes from blush blossom. His eyes do not have to be narrow like Bashful
add pen marks at the bottom of eyes and draw mouth
his eyebrows are slivers punched with a standard hole punch around a standard size hole.

Dopey
Sneezy style hat but point the oval up
No beard
wing from Two Step Bird for his ears
blue eyes
black pen work was too stark with those eyes so I think I just grabbed a caramel marker


You should also check out Glenda Mollets' blog HERE and scroll down - she put all my dwarfs on cards but she also added some of their bodies.  Really Cute!  She did a fabulous job.

Tuesday, July 6, 2010

Christmas in July

For last nights meeting with my upline and sidelines and downline, our theme was Christmas in July.  We were to bring a Christmas Card OR 2 tags for a shoe box swap.

I was soooooooooooooooooo not in a Christmas mood but managed to come up with these two tags.


Colors are Sahara Sand, Real Red and Basic Black

Punch art tree is the word window - reinserted to get all the different sizes.
Punch art check is the small oval next to a small oval hole.

Naughty and Nice was computer generated.

Bling on the tree is not SU but my order has shipped so my next item with bling will have the NEW BLING that SU has in our new catalog.

Monday, July 5, 2010

Flower Power Chick - The How To


Turning your hippie into a "hippi -ette" is pretty easy.
Legs and feet - made exactly same - just crossed differently since she is more flexible than he is.
Arms - same - but use your shirt paper color instead of flesh color
Hand - same but punch the tips of the word window with either word window end or circle in the new itty bitty shapes punch pack NOT the 1/2 inch circle since her hands are daintier
Hair - same  - just lose the beard (and I used Early Espresso for her hair color)

Differences:
Instead of wide oval use the butterfly punch for her body (you can't see it behind the flowers but I cut a "v" neck with my star punch and added a bit of skin behind it)
Give her a neck from a scrap - or a piece of word window
Draw on eyelashes, mouth and blush her cheeks
Add some flowers for props.

How to Build a Hippie

No, you aren't using wood planks to build him - that is the faux wood technique taught on VC Rocks this year by Brandy Campbell.  See what you missed if you didn't join VC Rocks this year?   This pose is the lazy punchers hippie - you avoid having to do his legs and feet - and you can easily give him a protest sign to display your sentiment.

FULL hippie directions follow:

I'll throw up the photos and a few tips - you'll get it!   Parts you need are shown above - you don't really need the wide heart to heart - but you do need to punch twice offset from that hole to get his arms.  The headband is just a scrap of orange.  The round white ring is the 1 inch circle punched around a 3/4 inch circle HOLE.

Then you have to modify some of these parts - I didn't show the modern label before punching hands out - but the rest of the "parts" that need to be altered are shown PUNCHED and then MODIFIED (photo below)

Snowflake trimmed down

Word Window repunched for nose

Modern label punched with 1/2 circle for hands

Modern label trimmed to slant then knees rounded

Word window - cut ends for glasses

Word window - fold in half - trim toes by hand - cut apart (this way your toes are identical for both feet)

Scallop oval - repunched for beard and bangs - TIP: slide in at the "corner" of the scallop oval for bangs - if you stick in straight in for the tip - you won't get the shape you want.

Small oval - cut in half for sleeves


Now you can see how he takes shape.  Marker for eyes and earpiece of glasses.  Tip: attach middle of peace sign at the bottom, then at the top, THEN trim off the extra snowflake at the top.  Heels don't matter because they are hidden by jeans.
He will look weird in the face until you get the nose on - don't worry - just keep on sticking his parts on.
I use SU Mini glue dots for assembly.  If a piece is small I simply roll the glue dot up to a thin line (wad) of sticky.

So just follow the pictures EXCEPT make sure your peace sign is turned the correct directions (some idiot, named me, nearly messed this up)