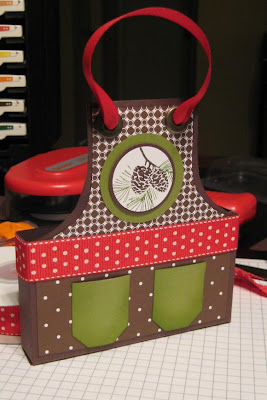
How cute is this? Wouldn't it make an awesome little hostess gift filled with Holiday recipes? This idea came from a share by Liane Peden on the yahoo group StampinUpLNStampers. I loved her idea so I gave it a few tweaks to make it my own.
I know you are going to want to make one, so I just went ahead and created a tutorial. (Idea was Liane's but this tutorial is all Ellen's - Liane probably has a much easier way to explain/create this)
Chocolate Chip Cardstock - 5 ¾ x 11
Score at 10 ¼, 5 ¾, 5, and ½ inchesTurn paper and score at 5 inches
Snip the scored lines – up to the last score line (you are snipping up ¾ of an inch). This is what forms the bottom of the apron box.
Cut away 2 ½ inches from the top of the apron box EXCEPT for the 4 ½ inch wide front of the apron.
 To get the curve, I traced the curved edge of my tape dispenser – (you could eyeball it for one side – then lay the piece you cut off on the others side, trace and cut so that the two curved edges will match.)
Cut your designer series paper for front of apron. If white core shows on the cut edge of the paper just run a marker along the edge

Attach two jumbo eyelets with crop-a-dile. Insert approximately 7 inches of red 5/8 grosgrain ribbon. Secure with tape. Cover the ribbon ends on the “inside” of the apron with square scrap of cardstock approximately 2 inch square.
Adhere ribbon around the “waist” – tie a separate bow and attached it to hide ribbon ends.
I used a pop-up glue dot to secure the bow.
Decorate at desired. I used the pine-cones from the Autumn Days set – inked with marker so I could have brown cones and green needles – punched with circle punches. I used the small tag punch for the pockets (sponged in old olive).
Here is a photo with a 4x6 index card so you tell the size.


12 comments:
Looks great! I wish I would have thought of something (like a tape dispenser) to trace the curve, much easier then free hand! Other then that, your pattern looks just the same! I think I am going to make a Christmas one too!
Liane
Adorable! I am going to make a couple of these today... one tiny change though. I'll do it at 5.5 instead of 5.75 so I can get two from a single sheet of card stock. LOVE it... and I'm flipping through the blog and having a great time. I have to go back ans see if you have an email subscription somewhere.
Tee
Cute Cute Cute... how do you get your bows so PRETTY?... I am soooo bow challenged.
Oh, I love this ... and I can't cook, not one bit ... but I'll be sure to make it for someone who can ... and include a great recipe for something chocolate inside ...
Thanks for the inspiration. I'd also like to know your tricks for tying such AWESOME bows!! :)
Ellen: I have to tell you - I love it! I love it so much I have to use it for a gift I need on Sunday. I figured I had something stashed away in a closet for this one.. but I do not! Thank you so much !
Chera Wiest
www.greetingsbychera.blogspot.com
Cool apron! I need to case it! Thanks for sharing the tutorial, you know I need them, lol.
I think this is something I will need to CASE for Christmas. Trying to start doing the things now for Christmas but I promise December 24 will roll around and I will still be trying to do some things. Thanks (as always) for the inspiration and fun.
Carey
Ellen you thrill my heart Thanks!!! Really a very cute hostess gift!!!!!
This IS the cutest thing I have ever seen!!! It's simply adorable! Thanks so much for sharing it with all of us! Off to make one right now.
This is adorable. Thanks for sharing it!
Ooh, I love this project! Such a great presentation and gift for someone special. Thanks so much for sharing your tutorial!
I'm glad that I've found your blinkthinkink.blogspot.com site. I'm so amazed by your way of thinking and writing. Have you thought about writing a book?
Post a Comment