Saturday, October 31, 2009

Candy Inspiration Card

I know you are going to look at this card and think Christmas but you need to think Halloween too...


This was made for a challenge on LNS to make a card inspired by our favorite candy.  Is there any doubt here that my favorite candy is a Hersey Bar?  I did the colors and the horizontal bars of silver and I even tried to imply the little sections that the candy has with my choice of background textures. 

Halloween is all about CANDY and this card is all about HERSEY BARS.  And no, I didn't eat one - but only because I didn't buy any to give away tonight.  Trust me, I can do Hersey wrappers from memory!

Happy Halloween!!!!!

Friday, October 30, 2009

Reverse Sooting Skull


This is a card I did for a "darker side" swap earlier this year.  The technique is called Reverse Sooting and I learned it from Lee Conrey.  This is so HALLOWEENY  but I almost forgot to show it to you!

Each time you do it, you will get a slightly different look. (Stamp = From the Crypt)

I taught a class on this for VC Rocks and one of the "students", Shari Dudek made this card for her swap - I like it much better than mine. (Stamp = Beware Pirates)

Isn't this an awesome technique for Halloween?

But it works for a vintage look too.  Almost like an old photograph.  But this set is retired (sad face)


Want to learn how?

Reverse sooting is a very easy technique but not one you will use very often.


It only works well with certain stamp sets. The train from “Happiness is a Journey” is my favorite for this technique but I have also used it with other “vintage” stamps that have lots of SOLID stamp area and lots of light/dark contrast.

Supplies:

Glossy paper, Versamark ink pad, taper candle (and something to light it with), stamp set with solid areas – light/dark contrast, something to protect your work surface from any dripping wax, a Kleenex or paper towel. (I say taper candle because you have to get the flame right up to the paper – if you have an unburned pillar candle that would also work)


How to:

• Cover your work surface, wax will drip if you are using a taper candle.

• Stamp your image on glossy paper with Versamark, not too close to the edge.

• Light candle and hold paper over it, very close to the flame (actually touching the paper) so that soot covers the image.

• Keep the candle slowly moving or you can burn a hole in your paper. If you hold candle too close to the edge of the paper it may catch on fire.

• Once the image is covered in soot, blow out that candle and GENTLY pat/wipe the soot with Kleenex or paper towel. DO NOT RUB HARD. It is possible to rub away all your work if you use pressure. Gently rubbing will remove the soot. You can then use your image on your project. Wiping with your finger it will feel smooth and the soot will not come off but if you keep on rubbing and applying pressure with your paper towel you will ruin your project.

Info:

• I wouldn’t use this for scrapbooking; I don’t think it would be archivally safe.

• Each image will look different due to soot application and how much you rub off. If you aren’t happy with your first try, do it a couple more times – yes, you are using up your glossy paper but if you need this look, go for it again until you like it.

• You can do the technique on whisper white to get a gray look. It doesn’t wipe off as “interestingly” but it is still pretty cool. You can also use it on color cardstock - play around and see what you like.

• I usually add further distressing with the SU distressing tool, tearing, etc.

• I learned the Reverse Sooting technique from Lee Conrey.

Thursday, October 29, 2009

Filling 2 Requests

I really didn't feel like working on what I SHOULD be working on (4 swaps) so I decided to play with some of the requests I've gotten for punch creations.

First is Mrs. Frankenstein suggested by Robbe in the comments of my Frankenstein post.  She came out ummm, well,  ummmm, sorta of, ummmmm,  ... odd?

I recommend swallowing all liquids before looking....


She is a cross between Bride of Frankenstein and Boobzilla.....


Hilarious, huh? 

Obviously gravity has done it's work on her chest - this is no hot young bride for Frankie!  How sad that the butterfly punch that can do Blog Babes can also have this effect on a woman's body.

Robbe, I'm not sure you can use her, but maybe she can be a starting point for you to work from.  Small Tag punch for head and hair.  Butterfly punch for boobs and shoes.  Word window for arms and legs.  1.75 circle for belly.  Small oval for neck.  Snowflake for hands.  She was done all in white except hair, eyes and shoes.  Color is sponged on.

NEXT

I got an email from Kathy Crowley.  She laid on some thick flattery so of course I jumped up and down waving my hand volunteering to try to make anything she wanted.  And what she needed was a dachshund.  I gave her a suggestion for the ears - which is what she was struggling with, so she completed her project without further help.  But since I was procrastinating anyway, I went ahead and made this.


 tiny dachshund

dachshund with a forehead


Body - word window
Head - large heart from heart to heart
Ears - large heart from heart to heart cut in half
Tail - 1 inch circle - toss the circle keep the hole - punch again around the hole getting a curved sliver
Feet - modern label cut in half - punch out the middle "bump"  on each end with a standard hole punch
Forehead (option) - 3/4 inch circle punch put behind the heart

All in Close to Cocoa sponged with Basic Gray.  Black eyes and nose from 1/16 inch punch

I couldn't decide which head I liked better - but either way, with the long body, I'm pretty confident it is recognizable.  I will probably put it in my BOM since my childhood dog was part dachshund.  And I have typed dachshund enough in this post that I think I will actually remember the correct spelling - learning to spell, another plus to blogging that I didn't expect.

OK - Now I'll get back to my swap chores - love designing them but hate making multiples.  Why do I keep signing up for these?  Oh yeah, it is because I love getting back all the cool ideas.

Wednesday, October 28, 2009

Here's looking at you, kid...

I found blog post inspiration a few days ago as it was headed for the trash. 


I had to pick up some contact lenses for one of my girls and the eye doctor's office sent them home in the cutest little bag - clear but covered with eyes (Appropriate? - Yes!)  Just as I was about to throw the bag away, all those different style eyes got me thinking about all the spooky eyes that might be peering out from the dark around Halloween- so I decided to see what I could come up with.  (I love Halloween and it appears that I can't really put it behind me until the actual day has come and gone)

So let's see what options we have and have a little lesson about conveying emotion through punched eyes

First I just made a series of simple eyes from the small oval punch and either a standard hole punch or a "piece" of the 1/2 inch circle punch.  This page shows just a few possible options.  And these are all glued down - they will remain consistant for four pages of examples.


Next I added just a small white highlight with the white gel pen on most of them and gave all but one ANGRY eyebrows  with the slot punch (one pair of eyes was already slanted to look angry).  This shows how adding just two small punch shapes can totally change the emotion of your character.


Next I slanted the eyebrows the other direction.  Now some look surprised, shocked, bemused, scared etc.  The eye slant, brow slant and positioning of the "iris" all combine to give emotion now.


Finally I just mixed it all up to make myself happy with the variety.


Of course the real variety is endless.  You can use so many of our punches for eyes and you can use PIECES of punches for eyes.  Look at this variety using the butterfly punch - trimmed by varying amounts with the small oval punch - that is right - no hand trimming - just punch a butterfly then punch again with the small oval (once for each eye)

I don't know about you but I definitely see frog eyes and owl eyes in this batch.

Imagine all the possibilities with the different circles and ovals PLUS why not star eyes?  why not word window eyes?  You have already seen me use various hearts for the whites of eyes on my punch creatures.


And you still have time to take this info and mail a simple Halloween card to brighten up a friend's day - if you stop reading blogs and make it RIGHT NOW!

Just punch a pair of eyes and pop them on a black card front like this...
Stamp a simple "Happy Halloween" on the inside, add a short note and you are good to go!

Or if you really have no time - file this away and use the eye idea in the corner of a black Halloween scrapbook page for a simple spooky accent with all the photos you take on Halloween.

Tuesday, October 27, 2009

Another Turkey


Similar to yesterday's turkey but smaller.  This time the 1.75 circle is the body and I moved the 1/2 butterfly up to be the head.  Same feet, waddle and feathers.  These colors were used since I did this for a LNS challenge to use old olive, really rust and ruby red.  I added the kraft paper, kraft button and natural hemp because I thought they NEEDED a neutral. 

Do you see the background behind the card?  That was me trying to get a different look on my texture paper by inking my brayer with vanilla craft ink. This is the back of yesterday's layout.  I liked the texture wheel that I showed yesterday better (obviously, since that is what is on the layout) but I will revisit this brayer on textured paper idea again someday - maybe you could try it and show me what you come up with.

Monday, October 26, 2009

My Biggest Blessings

Halloween is so close, I'm pretty sure you don't have time for any more ideas for that holiday, so let's get thinking Thanksgiving.  YUM! Turkey and stuffing and potatoes, and rolls and pie and...

Can you tell I'm still dieting? 

Back on task.
Here again are my two best blessings...


This is a little bit of false advertising - not that these are my blessings but that this is an Autumn picture.  It was taken during Spring Break when oldest was home from college (date recorded on back of layout).  But the colors of the photo worked with the paper and then I added the title - the first word that popped into my head and then the turkey just sort of jumped onto the page.   (Wild animals do that kind of thing, don't ya know?)


Body 2.5-ish circle (circle scissor plus)
Head 1.75 inch circle punch
Whites of eyes - 1/2 butterfly punch (vanilla of eyes, really)
Black in eye - standard hole punch, white gel pen
Waddle - 1/2 big heart in heart to heart punch
Beak - bottom part of the Full Heart (I don't type that much - I better get playing with that punch more)
Eyebrows - sliver from heart to heart punch (like clown eyebrows) but cut apart and adhered sideways
Feet - snowflake punch
Feathers - modern label punch, sponged with chocolate chip

Blessed title is the Jumbo Outline Alphabet - I LOVE that you can use this alpha set for more subtle titles and have your paper show through the lettering.


And this fab paper is Autumn Meadows from the mini catalog - talk about yummy, I love the colors!

The other papers on the page are straight from my scrap drawers - no cutting - I was challenging myself to use and position them "as is" (no measuring and no cutting) except I remembered the TEXTURE jumbo wheel so "size wise" they are as is - but I ran the texture wheel over them with chocolate chip ink - SO EASY - and I love the effect.


I'm just yakking now.  You can stop reading.

The sound just STOPPED on my laptop last night - I was rocking out with my David Cook CD and my headphones so that I couldn't hear the scary movie that baby girl and her two buds were watching and then NOTHING - no noise at all.

Got the girls to turn down that horrible movie so I could speak to two lovely young men (in India, I'm guessing) and the result is I have a hardware issue, under warranty BUT the only way to get it fixed is to mail them "my precious" and it will be gone for THREE WEEKS.

Ohhhhhhhhhhhhhhhhhhhhhhhh nooooooooooooooooooooooooooooooooooo!!

I will be trying to keep up with things but since I will be sharing the lone dinosaur machine in the kitchen with the kid, I might not have posts daily.  But I'll do the best I can.  

I functioned for 51 years without this little box but I will be suffering SEVERE withdrawal while it is gone.  Oh how quickly we become addicted... I'm sure there is a life lesson here and I'll have plenty of time to learn it while I'm waiting for my turn on the other computer.

Sunday, October 25, 2009

I like to be with you - Sisters page

We have a new unofficial tradition around here.  Since the eldest is staying AT SCHOOL and not coming home often, I started snapping a photo of my girls together when we eat out on each of her trips home.


The daisies are Gerbera Daisies - at least that was my intent.  My buddy, Dano, sent me these since I don't have the Flower, Daisies #2 die.  I knew if I played with some daisies I'd have to buy the die and I was correct, it is on the top of my wish list.  She rejoices in enabling me.  Gotta love having friends like that.


For the flower centers I did 1.25 circles same color, distressed - 1 inch circle darker color, distressed and stamped with texture wheel, 3/4 inch circle in chocolate chip stamped with texture wheel.  Each flower uses two of the daisy die.

The rub on I used is retired - it was from Greatest Moments.  I love that you can add rub ons on textured cardstock and even over uneven layers of cardstock!  A stamp would not have worked as seamlessly.


The flower in the upper right corner gives literal meaning to the term "cut flower" - didn't want it just hanging off the edge of the page.


Saturday, October 24, 2009

I'm melting...


This is not the gift for the Wicked Witch of the West (melting and all that mess)... But if you need a little more "adult" looking treat holder for someone next week (Yes! Halloween is next week!!) this might work for you.  The tutorial and template for this darling watering can can be found here on Splitcoast.

So easy and quick - just print the template on the back of your paper, cut, score, adhere and embellish as desired.  I used Stampin' Up!'s Night and Day Specialty paper from the mini catalog.  The tag sentiment is from Grateful Greetings (also in the mini).  The spider is from the set From the Crypt and is stamped in Versamark Ink for a subtle spooky feel.  Black Hemp is retired but you could easily substitute black grosgrain ribbon.  Mine is filled with candy corn in a small cello bag from SU - just the perfect size for this container.

Here is the first watering can I made - the day I saw the tutorial.


Tip - you can see the print on the inside of the handle if you use the template as is.  So instead of using the handle from the template - I suggest you just cut a strip of paper the same size.

Friday, October 23, 2009

Get your head on straight

If someone tells you to 'get your head on straight' it usually means they don't think you are making the best decisions.

In the case of this card - it is rather literal.


Of course I could also use the sentiment "Sorry, I must have lost my mind"

Or how about "What was I thinking?  Must have a screw loose!"

Truthfully, the card was made this way because my Frankenstein (Becky Hill's request) was just a bit too tall to fit on my card.  And I didn't want to just throw up another punch project unfinished.  And I couldn't come up with a scrapbook project for him (I could have saved him until someone was acting like a monster... but that someone would probably be me so I nixed that idea)

Here is the full sized frank-ster


The head - I used the small tag punch three times. 
1. punch a portion of the small tag into your black paper - punch your 1 3/8 square punch around the hole to get his hair
2. punch the small tag in green for his face - tag part down - sponge edges
3. punch another small tag in green for his forehead - cut down to a little under 1 inch - sponge edge - add scar with marker - adhere hair then adhere to face with dimensionals

The neck is the small oval - sponged and for the card version I cut zig zags

The neck screws and hands are the snowflake punch - trimmed to the right shape, of course

The shoes are 1/2 the butterfly punch - cut straight in on top of shoe.

Arms are word window - Frankenstein had straight arms so I couldn't use the ovals like I did on the "chin men"  (Didn't you ever do the Frankenstein imitation - walking stiffly with your arms straight out in front - hands hanging down?  Of course you did!) 

I made sure the top of the word window arms were not behind the ovals of the jacket - I wanted his shoulders to look as broad as possible

So Becky, does this work for you?

Thursday, October 22, 2009

Cold Cash

Today's idea started with the money holder my upline, Jenifer Lange, made for her poor (aren't they all?) college student child...    


She got the idea for the front of her money holder from Stamp with Heather and if you don't already subscribe to this blog, you MUST go right now and check out this blog thoroughly!

I wasn't giving money to my own poor college student for Halloween but I will be sometime - she occasionally reads my blog so I won't say when - let's leave it as the weather will be cooler than it is right now and it will probably involve a stocking...

I took the BOO sweet treat money holder idea and turned it into....Cold Cash!


I used two REALLY cute items from the mini catalog for this money holder, Snow Buddies, which is a hostess set and Sweet Treat Cups.

If you pull the "ca$h" tab you can access the change without tearing up the card.  And I just threw one of our snowflake punch pieces in with the money.

But the real "cold cash" will be in the pocket on the inside - amount and sentiment withheld since Mom wants to have a few surprises during the holidays. The stamps for "ca$h" are retired - Simple Serif Alphabet & Numbers.  If you have decent handwriting you could easily just do this part by hand. 


I didn't worry about size with this money holder since I didn't need an envelope - it won't need to be mailed - and you aren't suppose to mail cash anyway.  

Did you notice that all punches used in the creation of this card were used as intended and not forced into some weird or silly creature?  You didn't think I could be this normal did you?

Wednesday, October 21, 2009

Chins part 6 - Famous Chin


So today I give you a famous chin - and it sure isn't pointed!

Remember after Conan I said I could go down two different paths?  to leprechauns or to other late night talk show hosts?  Well today, for what I intended as the last in this series, I backtracked and took the late night host route.   So here is Jay Leno.  My hubby and I both thought this "Jay" could easily be switched to Bill Clinton - I think it is the face shape and hair style - could we do a series of presidents?  "We" could but I'm not..

I can't make you laugh as much as these two comedians can


but I hope you have been grinning somewhere along the way through the chinny chin chins. 

FYI - I have had several "requests" for different characters and I will share them as I get them made but I need to work on a few other things too - subscribe in google reader or keep checking back,  I will do my best to fill the requests I've gotten. 

I need a new identifying label for all these guys - they don't all have POINTY chins anymore and based on the requests we may have females in the line-up.  Suggestions?

Tuesday, October 20, 2009

Chins part 5 - Bring in the clown


Oh yes, I take reader requests and suggestions  - we can't always depend on that Inspiration Fairy - she can be quite fickle.

After I posted the hobo and the leprechaun, Gaby and Carey and Carolyn and Jenifer and maybe others suggested that I bring in the clowns. (And no Jenifer, I have no plans at this time to do the 7 dwarfs)

I don't know if this is exactly what these ladies pictured but it is what came out my fingers...


All SU punches except the body - and that is about a 2.5 inch circle using the circle scissor plus.

I think you see these punches but here is the list just in case
feet - large oval
arms - small oval
cuff - scallop oval (just a tiny bit)
hands - heart to heart - trimmed
collar - scallop circle
buttons - flower trio
head - ornament punch - "handle" trimmed off
ears - word window
hair - scallop oval (punched twice to get small pieces)
eyes - heart to heart, standard hole punch
nose - 1/2 circle
white make up - heart to heart
eyebrows and smile - heart to heart

I am really proud of my eyebrows on this one  - all I did was punch the large heart from heart to heart - toss the heart, keep the hole - then punch again around the hole with the same punch just offsetting the punch to get a "sliver" at the top of the heart - turn this "sliver" upside down and tah-dah!  You have cool eyebrows!

I did the same thing using the bottom portion of the heart for his "smile" but it didn't get me as excited.

I didn't sponge or shade anything on this clown - he would be even cuter if you take the time to fancy him up a bit.  

Monday, October 19, 2009

I am a Bookworm


I love to read.
My BOM would not be complete without a page on books! 


And I just had to take a quick break from the pointy chin men - yes, there are more coming. 

Want to see my book page?  If no, click that little x on the top of your screen, otherwise look here:


I cannot believe how much I like this layout.  It has two colors I rarely use - Sahara Sand (textured) and Brilliant Blue and one color I usually hate, Glorious Green and yet I LOVE them together on this page. 

I had glorious green scraps on my desk from the Christmas Elf (HAD to use it for him) so that is what I picked up to run through the Big Shot for the hearts and bracket (Hearts and Brackets Die) - I was just playing around experimenting with title ideas - no intention of actually using that shade of green (super yuk).  I had already made a worm in Green Galore to use on this page. To my great shock - I loved the Glorious Green and black on the sahara sand so I remade the worm to match.

When I remade the book worm I snapped a photo so you can easily see the punches I used. 


  • Worm is 1/2 inch circle, 3/4 inch circle, 1 inch circle, TWO 1.25 inch circles and the large oval for his head. 


  • Eyes are 2 white 3/4 inch circles with standard hole punch in black  (white gel pen marks)


  • Glasses are (two) 1/2 inch circle holes - then punch around the holes with the 3/4 inch circle to get the rims. 


  • Ear pieces are (two) slot punches

I sponged each worm segment with glorious green ink. And I ran a black marker around the edge of the eyes after adhering the glasses since some of the white showed on the sides.

The book stacks are simply a combination of various rectangles with some word window punches that were cut down again with the word window punch to get the "going in" curve.


I added some narrow black lines (from trimmer) to give the worm and the books a 'base' so they were not floating in mid air.  You will see lots of narrow lines in my scrapbooks - guess that is my 'signature thing' since I repeat it all the time. 
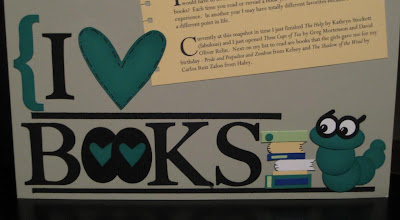
I may have someone in the family take a picture of me reading and I will slip it below the top book stack but I may not ever get around to it.  The one photo I found with me reading is just TOO unflattering for use here. I'm about truth in the scrapbook but some truth is just too ugly to post on the Internet.  It would be perfect for a blackmail album. 

Blackmail album idea - one I have never gotten around to doing but intend to someday - use a black album and include all those bloopers and photos that should hit the trash can or recycle bin but you kept anyway.  The ones where your kid just kept sticking his tongue out - or the one of your backside as you hung stuff on the tree - those would go here. 


I may use a bigger picture and take some photos of my bookshelves and make this into a two page spread - I am so freaked out about liking this shade of green with the black and sahara, I feel like I should use more of it while I'm in the mood. 


The little worm is easy to make and I think he is precious.  Maybe you can use him with an apple if books aren't your cup of tea?  If you don't need him on a card or scrapbook page how about on a bookmark or a gift tag when you give a book as a present? 

Sunday, October 18, 2009

Chins part 4 - Man in Green and Red

I'm back for yet another take on the "chin men".   Green but not a Leprechaun - it's an Elf.


You can go back to the earlier "chins" posts if you need to be refreshed on the basic "how-to" for these pointy chin men.  He is very similar to the Pilgrim but there are some differences besides color choices.

What is different about the elf? 

His ears - not really pointed but heading that way with the heart to heart punch. (you could use part of the 5 petal punch and get POINTED ears - I didn't think about it until after I was done)
His shoes - 1/2 a butterfly punch then I punched the 1/2 circle punch into it so the toe would looked like it was curled up.
His collar was done with a section of the scallop circle
His hat edge is the border scallop - then I stuck that in the word window
His BIG hat is free hand (obviously) - you can make it much smaller - whatever fits your project
His hat fluffy is Boho Blossoms - all three of them stacked

Wouldn't he be cute with stripes on his socks?  Or you could texture that big old hat with some of the texture plates - I can think of lots of ways to "improve" him but I'm not going to try them until I make him again for an actual project - these chin men I've been showing are just mock-ups to get the basic design down.
I hope you are finding ideas that you can use during these days of "Chin Men".

Saturday, October 17, 2009

Chins part 3 - Pilgrim Man (by request)

So far, our chin men have included a Hobo, Conan and a Leprechaun from the same basic pointy face and body. 


Today I am changing the body a little bit to meet a reader's request.  Beth Saremba asked me if I would do a full pilgrim man (the mouse in the hat wasn't what she needed) so, ever desperate to please - I did.


his body is the 1 3/4 circle
his thighs are the small oval punch
his calves are the word window in white
his shoes are half a butterfly trimmed just a tiny bit.
his hat brim looks like a word window but it is actually longer
  • To make the longer hat brim - cut a strip 3/8 inch wide with your paper trimmer - insert just the end into the word window (feed from the punch opening into the slit) -  round one end ,then do it again to round the other end. 
his buckle on hat and shoes is just like the chain link found here
his collar,cuffs, and top of his hat are all freehand

Beth, I hope this helps you out. 

Friday, October 16, 2009

Chins part 2 - Man in Green


My brain (odd thing that it is) finished Conan and was at a fork in the road.  I was heading towards other late night TV hosts OR other Irish men.... Jay Leno or Leprechauns?  Who knows - Jay Leno may eventually be immortalized in punches but his chin is certainly not pointy so I took the easy route and went GREEN.

I know it isn't St. Patrick's Day, so what am I doing showing you a leprechaun this time of year?  It is always a good time to tell someone that you are LUCKY to be their friend, know them, love them, be married to them, etc.  So stick him on a card or a scrapbook page with some four leaf clovers and announce just how lucky you are.

Very similar to yesterday's chin men - but he has butterfly punch shoes (trimmed), with a slot and hole punch accent, a bowler hat (circle and word window) with 4 hearts as a clover (heart to heart).  His nose is the 1/2 inch circle and his hair is the scallop oval - punched twice to get the smaller pieces. 

He also looks good without the hat if you trim off the "handle" of the ornament - then you have an almost bald leprechaun.  Pretty cute!


Thursday, October 15, 2009

Chins part 1 - Men in Black

Yesterday as I was working on the witch, I picked up the wrong sponge to add depth on the edges of her face.  I left too dark a shadow so I set it aside - then that "oops" turned into this:


Why would you need a hobo?  Maybe that is your Halloween costume?  Maybe you have stories to scrap from the depression 1930s or recession 2008?  I don't know - but I just HAD to make him once the idea came into my head. I think my stamp area being clean may have left the Inspiration Fairy just a little disoriented.


But then, a thin guy in a suit with a pointed chin brought Conan O'Brian to mind.  I had to get him on paper so I could get him out of my brain (I'm more of a Jay Leno girl),  so I made this guy...


Why do you need a Conan?  Well, you might have gone to his show (Jenifer)  or he might be the main thing your son wanted to see when you went to New York (Jenifer) or you might have a secret crush on him (?)  or you might want to do a BOM page about your sense of humor.  My job is to follow the I-Fairy's lead, what you do with these ideas is your problem.


I will probably wind up changing him slightly and using him as my hubby - a thin man who wears a suit but different hair. (Way different)


  • Conan's hair is the curly label punch (cut) with the 1 inch punch  punched into it - near his face. 
  • Shoes are biggest heart from Heart to Heart punch (trimmed) 
  • Arms and legs are small oval hole with wide oval punched around it. 
  • Shirt collar is smallest heart in Heart to Heart punch (2).
  • Tie is the smallest arrow in My Way punch (trimmed). 
  • Body is wide oval. 

Isn't it a shame that poor Conan has to wear the same shoes as the hobo?  Maybe it is time for some shopping.


Avoid this blog for a couple of days if you don't like the pointy chin men - I have at least two more ideas coming up. Unlike these, the next two might actually be useful.  You are getting them in the order I "thunk" them up - not in order of usefulness.


Men in Black?


Wednesday, October 14, 2009

The Truth

Almost didn't have a post today...
Want the truth? 

It is because my play area looked like this.


I had to spend some time digging out and organizing.  Not as fun as stamping and punching but won't it be nice for me to work in a clean space tomorrow? 

Now it looks like this


Let's just hope the Inspiration Fairy recognizes the place and comes back to work tomorrow!