Sunday, January 31, 2010

Chipmunks

Kellie Paxton made a second request (don't worry, she isn't being greedy, she says it is her last for awhile).  Her husband got himself in a pickle - read this:

'I have a group of ladies that meet the 2nd Tuesday of each month. My husband, Michael goes with me. He takes pictures and helps with the projects and whatnot. Well, last month the ladies were joking with him and told him that he was welcome to bring some Chippendales with him next time.

And of course he says, "I will see what I can do".

So in all his cleverness he wants to bring Chip and Dale the chipmunks!

What do you think? Is it possible to punch chipmunks? "

Well, these are not EXACTLY those chipmunks but I hope close enough to get him a few laughs.


Here is your pictorial how to:  See photo below for which color to punch.

Row 1) Approx 2.5 inch circle from circle scissor plus for head  - large oval and 5 pt flower for ears

Row 2) 2 full hearts, 2 small ovals, 1 3/8 inch circle for eyes

Row 3) two 1.25 circle, large oval, wing from Two Step Bird, 1/2 inch circle for cheeks and nose

Row 4) two large oval, butterfly,small oval, tiny scrap for mouth

Trim as shown below....
Start your assembly...
To make the "other" chipmunk just change the nose to red and use two teeth instead of one.

The Chip and Dale cartoon I remember watching had them being brought into Mickey's house in a Christmas tree he chopped down, then they ran around in the tree moving ornaments as he decorated.  So I did this layout and will use it for photos of decorating our tree.  (not printed yet)


Saturday, January 30, 2010

Guest Puncher - Annette McKillop (Mechanic card) and I got a gift!

Remember me talking about the darling Mechanic Card and giving you the link?  Well, Annette McKillop read my post and sent me the picture so I could share it directly with you.  I don't want you to miss this because I LOVE this card - I love the little wrench and the way she put her sentiment on little nuts.  TOO clever!!!

Thanks Annette for letting me show off your work!

Then my sideline. Eileen - the one that is the fabulous cook and the glittery stamper - shows up at my door with Egg Rolls (yum) AND a gift for me.  Wanna see?

How cute is this little supply holder?  She added the paper and cut it strategically so I would get the piece that said PUNCH.  I just love it!!!!

(Of course she is really sending me subliminal messages -it says "glitter" on the same side)

I said I'd get  back to punching after yesterday's scrapbook share - and I did.  I have two CUTE things in work but they just aren't ready to be revealed yet.  Soon, very soon.

Friday, January 29, 2010

At Sixteen

One more scrapbook share and then I'll do some more punching.  I bet you can make it another day without your punch fix.  If you can't, pull out your punches and see what you can come up with - might surprise yourself!

This is for another challenge on the group I talked about yesterday.  This is for the color challenge.   You were supposed to use teal, brown, yellow and orange.  Neutrals allowed.

I used those colors AND a sketch from this blog from January 21st.  Wow - layouts are so much easier when you chose a starting point and the possibilities aren't TOTALLY endless.

Here is what I did using a photo of  "kid still at home"
I used the new Sweet Pea designer series paper stack from the Occasions Mini Catalog.  The @ and the 16 are coasters covered in paper and run through the Big Shot using the SU Alphabet Simple Numbers Die.

I'd like to impress you with some fancy design talk about the colors and the circle showing energy blah blah blah but.... do you care? and would you believe my B.S.?

I really did make the teal line into an arrow to represent how this feisty red head has life by the tail and is ready to move on into whatever the world holds for her.  I'll probably add some journaling to that effect on the teal border on the left side and the top.

Thursday, January 28, 2010

Back in the Scrappin' Saddle

Warning - No Punch Art this post.

I want to get back to my scrapbooking ways because
1) I think telling my "stories" is important
2) I have a gazillion photos in boxes and on the computer
3) I enjoy it


But I usually have to do a few layouts before I get my groove back.  This was my first page back and I like it but I don't love it.  That is OK because if I had to LOVE every page - well, that would be too much pressure and I'd stop enjoying the whole process.  And I like it In Real Life much better than I like this picture of it - I guess I need to work on taking photos of layouts.

I joined an online group that has monthly challenges and this was for the Recipe Challenge for January.  BRRRR - which meant it had to have
B - Blue
R - Rounded corners
R - Rhinestones
R - Rub-ons
R - Rick Rack

And it had to have lots of white space  (Empty area, not necessarily white)

I am so not a rhinestone girl.  And I had no rick rack in the colors I wanted to use - so I made some from paper and the scallop border PUNCH (of course).  My rub-ons match the One of a Kind stamp set but they are retired (Urban West).  Buttons and Rhinestones from my stash.

I love this photo of college girl but it has no specific story associated with it so I thought it would be good for a layout without journaling.

And after using the rhinestones I decided I like them and will use them more in the future - and that is the purpose of challenges - to stretch yourself and grow a little in your craft.

Check out this Challenge Group if you are a scrapbooker and interested in playing along.

Wednesday, January 27, 2010

Firefighter Guy

I decapitated the Stefan/Demo/Dentist trying to give him yet another career as a firefighter -but his head was too wide for my helmet.  Sorry for that unnecessary pain, Stefan.


This it to fulfill a request from Kellie Paxton because two of her "guys" are firefighters.

Here are the details so she (and you) can recreate him:

Helmet - large oval, wide oval and a piece of the ornament punch (could be cut by hand)
Head - large oval, 1.25 circle trimmed
Ears - word window
nose - 1/2 circle
Eyes - standard hole punch
Mustache - tip of the butterfly punch
Eyebrows - slot punch

Black shirt -large oval trimmed flat at bottom
Coat - wild oval cut in half and separated by the shirt
Coat collar - word window trimmed
Coat fasteners - word window around slot punch hole, re-trimmed with word window
Arms - word window folded
Gloves - heart to heart trimmed
Pants - wide ring from wide oval punched around small oval hole trimmed to make legs
Boots - butterfly punch trimmed

Hose - ring from 1.75 circle punched around smaller circle hole, snipped and folded
Hose spout - hand trimmed piece with bit of slot punch on end
Water - modern label punch trimmed

I meant to stamp a number on the red part of his helmet but forgot to do it before I snapped the photo.  My favorite number is five so that will be his number (if I ever get around to it)

Hope this helps you out Kellie!

Tuesday, January 26, 2010

I love you THIS MUCH Turtle

I know I have already done a turtle but I didn't have a lot of time to punch for today's post, so I took a step back from the more complex stuff.


I started with an idea I got from a 1/2 inch size picture in a craft catalog.  It was the front view of a turtle with hearts as the shapes on his shell. 

Details:
Approx 2.5 inch circle from circle scissor plus for shell
1.25 inch circle - flat on bottom for head
3/4  inch circle - mouth
1/2 inch circle in melon mambo - tongue
New small heart and standard hole punch - eyes
Word window and 1/2 inch circle - front legs and feet

Shapes on shell are the small Heart to Heart hole with the NEW Small Heart punch around it - giving you a heart shaped ring

NOW.....
Have you seen Jackie Topa's fence using the NEW Medium Jewelry Tag? Jackie has been making amazing punch art way longer than I have been punching - she is FABULOUSLY creative and does way more than just punch art.  Make sure you check this out.

Monday, January 25, 2010

Hut Hut Hut

No, not tropical island kind of hut with the wind in the palm trees....  That would interest me a lot more than this. 

Alas, it is Super Bowl time and I got a request for a football player.  Football is NOT my thing.  I am a basketball girl - GO MAVERICKS!!!! 

So although I live just a few miles from the Cowboy's new stadium, I don't care.  We did win some tickets and went to a game and had fun checking out the beautiful new stadium and they won that day but it just isn't my thing.  High school football is great and college games can be loads of fun but Pro Football?  I don't like it.  Please don't send hate mail.


Beth Saremba requested a "neutral" football player so I just randomly chose Red and Black - at least I'm pretty sure those aren't Colt or Saint colors.

I do know enough about football to know that the player I just created is a Center.
And that he is about to fumble because he has no hands
And that lines do not run diagonally on the field like I have them here
And that I'd have to be on the defensive line to ever get this view (which will NEVER happen)
And I'd rather be the quarterback because he stands behind most of the other players with a view of rear ends in tight pants. 
Which brings up the one thing I hate about basketball - long baggy shorts.  Oh for the uniforms of the 1980s....sigh....

Guess you might want some How To info

Here is the helmet:
1.75 circle cut with scissors for helmet opening - random strip from my desk for stripe (you will have to find one on your own desk, I'm going to clean up in a minute)
Oval ring for top face-mask line (large oval punched around small oval hole)
Wide oval punched next to wide oval hole for bottom face-mask line

Here is the rest of him:
1.25 circle head
1/2 inch circle -Nose like Curly's in 3 stooges post
Small Heart and standard hole punch eyes
Wide Oval body
Small Oval sleeves
Heart to Heart arms
Wide oval punched again to get U shape for legs (can't see but they are there in black)
Word window legs
Butterfly shoes
Spiral punch throwaway parts for cleats
1.25 inch Circle re-punched to get football
Draw on your "mean" eyebrows and frown (and football laces)

Blog Poll Results and Punch Tip

Blog Poll Results - I usually just look at the polls, chuckle and go on my merry way without discussing them but I just gotta talk about this one.

Somebody wants me to blather less.  Dear 'whoever voted that way', that option was a joke.  Please don't be upset, but no way will I stop yammering - so just skip the typing, look at the photo and move to the next blog.  OK?  Just because I type it doesn't mean you have to read it. (grin)    FYI - No picture this post so quit reading now.

Not many of you want to see more scrapbooking - I understand.  It is kinda hard to get ideas you can really use from someone's vacation photos but scrapbooking is going to be part of my personal focus this spring so you'll probably see some of it here - I just wanted to know if that was gonna disappoint y'all.  And it is.  Sorry.

Speaking of disappointment...what the heck is wrong with y'all?  Why don't ALL of you want to see George C. pictures?  Are you too young to appreciate such a good lookin' man?  Well, if most of you don't want them, I guess I'll not post any.

Seriously (if you think I can be serious)....
I was really just wanting to see how many of you REALLY needed tutorials and how many of you REALLY want to see finished projects and how many of you REALLY just want to see some punch art in any form I feel like punching.

I appreciate the votes in the poll because I know you all spent HOURS considering all the issues before you cast your ballots.  Right?

I also did the poll to make Carrie Nixon happy.  She like polls and I like comments - so she leaves comments all the time and I give her polls when I can think them up.

PUNCH TIP:
I have never been a believer in the tips to freeze a punch if it is sticking or to punch through foil to sharpen your punches.  Tried it - didn't see any results. 

After making my Christmas cards with all those snowflakes, my dear snowflake punch was sluggish. 

Then I made Cupid with his little arrows from that punch - whoa, I had to REALLY work at that. 

Then I wanted to make 10 of him for a swap and than meant 40 arrows. 

Poor old punch would not cooperate.

I tried the freezer overnight - nope, no help

Since I only needed the "edges" of the snowflake to make the arrows, I punched 1 inch circles and stuck them in to get the pieces I needed.  I got my swap DONE.

But I still wanted my snowflake punch to work for the future.

Think think think....... nothing

Then I was reading Hints from Heloise in the newspaper and someone talked about how sharp her scissors seemed after cutting heavy duty foil.

Well....... maybe?   I do have heavy duty foil  --- and when I tried before I probably used regular foil.

Punch the shiny silver stuff.  punch cardstock - nada
punch foil again. try cardstock -  nada  
punch punch punch punch punch punch foil, try cardstock HEY, I think it is working better..... punch punch punch punch punch   yes, it IS getting better

punch punch punch punch punch, try cardstock again and YES!  I HAVE A PERFECT RED CARDSTOCK SNOWFLAKE!

YES YES YES YES YES --  VICTORY IS MINE!

So here you go - personal testimony that punching (over and over and over and over ) through heavy duty foil may save a sluggish punch.  I am a believer!

Sunday, January 24, 2010

Guest Puncher - Sheila White

People have started sending me original punch art that they were inspired to make because of this blog;  That just makes me grin from ear to ear! 

When I receive something fabulous from now on, (and if they give me permission), I'm going to share it with you.

Sheila White lives in North Carolina and sent me two great projects. She admits their might be a competitors punch in these somewhere but we will forgive her for not being an SU purist.  I mean, if you own a punch you HAVE to use it.  You wouldn't want any of them feeling neglected, would you?

On to the good stuff. 

First we have Woody from Toy Story by Sheila

How cute is that?

Then we have some kids playing soccer by Sheila - the net was done on an electronic cutting system not punches.


Thanks Sheila for letting me show off your work.  Keep on punching!

Saturday, January 23, 2010

The Sailor's Sweetheart

I got a chance to punch Olive Oyl


She is made to a different scale than Popeye, so it is hard to put them together on a project...
Here she is up against his card - see? - she is too small.


The idea I had was to make a long card (business envelope) and have Olive with a thought bubble above her head - with Popeye's head in the bubble.  That is why I gave her the popped up heart on her shirt.  But I ran out of time.  Parental Health Crisis strikes again.

Do your best to imagine it and I'll punch again when I can.

Friday, January 22, 2010

Career Change

Sometimes it is bad to make requests.  Stefan Brock got himself immortalized as a male stamper but then he got himself decapitated into a career change....


I beheaded him so I could use it when Robbe requested help with a Dentist...

I hope that wasn't too painful Stefan.  At least you know what you would look like if you want to be a Dentist for Halloween next year.

All the same as the Another Guy post except
The body is the 1.75 circle - cut to flatten, with closure and buttons drawn
Sleeves changed to white
Lost his apron and punch
Head lamp - 3/4 circle and standard hole punch
New watch, same brand (grin)

Oh and I found the Mechanic I wanted to show you.  The reason I couldn't find the photo was that it didn't come as an attachment - it is a link here - so so so cute!

Thursday, January 21, 2010

My Heart goes Boop-Boop-a-Doop for you

I was looking at Popeye and realized his face cheeks are the same punch as Cupid's butt cheeks - ewwww, poor Sailor Man.

Moving on....

I still want to try punching Olive Oyl but she wasn't the female cartoon that the Inspiration Fairy wanted to do.  Oh no... the sweet little I-fairy wanted to do work on someone else.

While I was poking around on google images looking for help for the sailor man, I spotted a Betty Boop image and was INSTANTLY aware that Betty's face is the exact shape of Stampin' Up!'s Curly Label Punch. 

How weird is that? 

And why haven't I noticed before now?

Of course the I-fairy leaped onto my desk and started grabbing punches and handing them to me.  This is what we came up with:


"Blog Babe becomes Betty Boop"  - say that three times fast.  If you are new-ish to the blog you need to go look at the blog babes - one of my first "human" punch projects.

Something to learn from Betty:   I needed a certain size circle for her eyes. Standard hole punch was too small and 1/2 inch circle was too large and they HAD to be circles because that is part of Betty Boop.  WHAT TO DO?

The solution was to grab the word window punch (My first SU punch) - punch, then reinsert it so that just the end gets re-punched giving you a circle just the right size!  Victory!

I also needed a certain size circle for her mouth.  Fortunately, I still have the right punch.  Unfortunately, you might not because the Powers that Rule at SU retired it.  Fortunately, if you have a Crop-A-Dile you are in luck because the small hole punch of the C-A-D is the perfect size for Betty's lips.

Edit for hair directions:
Punch the curly label next to the curly label hole - draw on the "part" with white gel pen

Punch the curly label next to the curly label hole AGAIN for the other side of her hair - it that slips behind her face (her right, your left)
Boop-boop-a-doop!

Just some numbers...

If you aren't a blogger you might not be aware of this but we tend to LOVE
  1. comments
  2. blog statistics
Obviously we like comments because that gives us direct feedback on our work.  But we also like to see how many people come to look at our projects because.... well, maybe just because we like to know there are people out there on the other side of the computer screen.

I didn't start my counter until the blog had been going for about three weeks but......

 today the blog passed    (drum roll)

50,000 visits
AND
150,000 page views

Both since Sept. 12!

BOTH ON THE SAME DAY!  
And in that same time frame I posted
125 times. 

Whoa, how many hours have I spent doing this?  Hubby will say "too many hours" and I will try not to pout about his comment and then I'll be right back on here tomorrow.

Thanks for wading through my yammering each day and don't forget to vote in the poll - top right hand corner.

And many thanks for all the kind words and lovin' you have sent me.  I appreciate your loyalty very, very much.
hugs,
Ellen

Wednesday, January 20, 2010

The Sailor Man

Yesterday's nurse had those skinny legs which my upline, Jenifer, said reminded her of Olive Oyl and she KNEW saying that would lead to this...

Yeah, I know his nose is too large but I'd rather have this shape and too large than small and round.  Feel free to find something better and tell me what to try.

Here is a big punch art secret (shh..... don't tell EVERYONE!)  When you can't or don't want to punch the "bottom" half of a character - just have them poking out of a circle.  I figured that out way back when I tried Cookie Monster

I cut this circle with my circle scissor plus.  I didn't like this tool at first.  I couldn't get a perfect circle.  Of course, I wasn't doing it correctly.  The key is to use plenty of Dotto - temporary adhesive. and then stop cleaning your glass mat so thoroughly.  Let the glass get "seasoned" with the adhesive and use the adhesive and when your paper stays in place your circles come out p-e-r-f-e-c-t!  The red base of the card is showing, the brilliant blue is one hole and the turquoise is a ring on the blue.  See, I really did conquer the circle scissor plus!

Head - 1.25 circle, 1/2 a butterfly
Nose - wing from NEW Two Step Bird  (I think I call the wing a leaf in some of my past directions, sorry)
Ear - small Heart to Heart
Eye - standard hole punch
Winking eye - the throw away part from the NEW scallop border punch - kinda tucked behind the nose
Eyebrow - part of the scallop from the NEW scallop border (yes, I am brilliant sometimes)
Mouth - part of the same punch as eyebrows
Hat - piece of modern label re-punched to make shorter and a 3/4 inch circle
Neck - My Way arrow
Shirt - large oval snipped with my way arrow to get V neck, standard hole punch buttons
Sleeves - small oval HOLE punched with large oval to get thin ring and slot punch
Arm - My Way arrow
Forearm   - 1 inch circle
Hand - 3/4 inch circle, trimmed, fingers drawn
Pipe - 1/2 inch circle trimmed straight on sides, slot punch cut in half
Spinach can - 1.25 circle cut straight on sides and re-punched to round in the top
Spinach - leaves from branch of NEW Two Step Bird

Jeez, that was a little complex huh?  You should have been here with me trying to figure him out!   I googled his image and this is a conglomeration of some of them - was thrilled when I saw one in a circle reminding me of that old trick - I was struggling with his legs. 

So it was a little hard but if you ever HAVE to have the muscle bound Popeye the Sailor Man on a project - you know how to get him!

Shall I try Olive Oyl?  Maybe I will, they'd be great on a Valentine together!

Tuesday, January 19, 2010

Nurse

What with this weeks "nursing" duties and a request for something for nurses from Kathy Hamrick, I just had to do this...

I chose to give her a "clipboard" using a silver clip from the Clip Assortment.


Here she is with her hands empty

You could add anything you want:
Needle
Teddy Bear (like the one from Good night Santa)
Food Tray
WHATEVER you can thing of!

Dress - 1.75 circle trimmed with scissors
Sleeve - part of large oval
Shoes - butterfly punch trimmed
feet - small oval trimmed
Legs, arms, neck - thin oval formed by punching a large oval around a small oval hole
Face - 1.25 circle
eyes, nose - standard hole punch
hands - trio flower trimmed
hair - scallop oval
hat - could be trimmed by hand but I trimmed the ornament punch - point of hat is point of ornament

Thanks for all your good wishes for our family health issues.  We got a positive report from the doctor, some additional help hired and I think the situation is almost under control.  Still a way to go - but there is light at the end of the tunnel.  Your caring words are so appreciated.  Thank you!

Monday, January 18, 2010

Another Guy...

Isn't it awesome how sharing your creativity just generates more?

I made the UPS guy (based on a request from Brenda Workman)
then
Lynn Pratt made a Lady Stamper (based on my UPS guy) - Love her project - FABULOUS idea!  When you see it you will want to make one RIGHT THEN   (I want the Lady Stamper shoes! Not so much the hips...)
then
During my punch time Sunday afternoon, I made this Male Stamper (using Lynn's apron and a request from Stefen Brock)


Stefen Brock is a Stampin' Up! demo and I think he was feeling that the 'SU guys' were being left out.  This is loosely based on the photo I had him send me.  I 'borrowed' Tess's punch from the new Totally Tess set in the spring mini catalog for paper "Stefen" to use.

If you read the UPS guy and Lynn's Lady Stamper posts, I think you can figure out how I made him.  Changes are Modern label punch for his khaki (kraft) pants - trimmed off the bumps at the bottom.  His spiky hair is a part of the scallop oval with the tip of the small star used on the scallops.   His nose is like Curly's in the Three Stooges post.  Eyes are standard hole punch.  Facial hair was sponged on.

Now I realize not that many of you have need of a "male stamper" but put a white apron and a knife in his hand and you have a butcher.  Or put an orange apron and a tool in his hand and you have a Home Depot guy.  Or give him another apron and some tongs and make him your husband at the grill.  Use your imagination. 

Someone send me a photo where they turned the UPS guy into a mechanic for a GREAT card for their son.  I'm trying desperately to find where I saved it!  Double drats and darn it, I appear to have hidden it from myself.

When I find it, I will ask her if I can share it.  Dear Mechanic's Mama, if it is OK for me to post the photo of the card, would you please share it again with the old crazy blogger who misplaced it?  Thanks!

And yes, this uses the ornament punch which is not available at this time.  If you want it, contact SU and request that they put it in the next catalog.  It can't hurt to ask.

Thanks for all your positive thoughts on the health front.  A little good news is trickling in.  And dear sweet hubby is taking night nurse duty tonight.  I think I am "off duty" until 8ish tomorrow morning.  Yeah!


Sunday, January 17, 2010

Purple Dragon

Sorry for the absence - looking like posts may be sporadic this week too.   Family health just has to take precedence over punching and blogging. 

Hubby got back in the country and took his turn playing nurse so I did get to spend some time at home and jumped on the punches, because that is what makes me happy.  But don't expect tutorials this week because making those does NOT make me happy and we have enough unhappy this week as is.  I will be happy to answer specific questions.
Here is one of the things I worked on.


Mentioned my 'dragon days' in my Knight in Shining Armor post (which made me want to make a dragon) - I'm thinking this little guy looks a lot friendlier than I act on those days.

If you think this guy is cute then you need to go check out this guy - and this guy (who was inspired by the first one) absolutely the cutest punch dragons I could ever imagine!  I hesitated to even try a dragon because I knew I couldn't match them. So Clever and Amazing!

Not sure what project I'll use this beast on... but that really doesn't matter - it made me happy just to make him!

Back to nursing duty tonight. 

Friday, January 15, 2010

Raggedy Together


Had this punched ready to go but no funny comments, sorry. 

We are having a small parental health crisis so I'm scheduling this to post while I'm running around like a chicken with my head cut off, trying to be three places at once.

I'll be back as soon as I can. 

Thursday, January 14, 2010

Shiny Knight in Amour

Yesterday I showed you a Knight in Shining Armor.
Today I give you a Shiny Knight in Amour...

(groan)


Hey, I warned you about my sense of humor a long time ago. 

And the knight is shiny in real life (clear embossing).  Maybe I should add some glitter?  I can hear my sideline Eileen saying "yes, it needs glitter".

This will be going to a friend who has reentered the 'dating world' and is kissing toads again.
This is the sentiment I'm using...

You don't need a Knight in Shining Armor;

A Shiny Knight in Amour will be fine
I just hope he....

Treats you like a Queen!


I hope to make a chess piece queen from punches to go on the inside (maybe a pop up?) but I haven't done it yet - I have time before Valentines Day.

Wednesday, January 13, 2010

Knight in Shining Armor


He is my Knight in Shining Armor!

I made this for hubby because most days this feels true...

Of course there are a  few rare days when I want to harm him.  (That would be on my dragon days)

But I am showing you in case you can use it for a Valentine for your sweetie.

Here is the outside of the card...


Very Manly


And here is the inside of the card:


Pretty clever, huh?


And here is the sentiment from the retired NEW in mini catalog rub-on set Chat Room


He will be in full agreement...
(insert eye roll or smirk here)

Really, he is pretty wonderful (safe to admit without him getting a big head, he is out of town, too busy to read this)

I'm not doing a full tutorial on the card but I will show you this photo to help you with the Knight


Part of a 1.75 circle  - stamp with the new solid stripes set from the mini

For visor - take an ORNAMENT punch (no longer for sale) hole - re-punch a little bit above the hole to get this shape - You could just cut this by hand if you didn't take my advice and buy the ornament punch.  Draw lines by hand and add glitter

1 inch hole, punch around it with the wide oval, use the 1 inch circle to snip in both sides at the neck

large oval - stamp with Canvas (retired) to look like chain metal. (stamping pretty subtle, can easily be skipped)

I think you can do the face on your own.

The castle door was stamped with Wood-grain background and sponged heavily.  I got the oval shape for the door by tracing my scotch tape dispenser (like I did with the apron recipe holder).  Spiral punch for castle top.  Stonework done freehand (sloppily)

Tuesday, January 12, 2010

Three Stooges

Do you (or did you) have TV shows that your kids can't watch?

What am I asking?  OF COURSE you have shows your kids can't watch - I can't even watch some of what is on the tube.

My Mom had it easier back in the old days.  She only had to monitor four channels and they weren't even on 24 hours a day.  The Star Spangled Banner played around midnight and then all you could see was fuzz. (yes, I am older than dirt)

Still, Mom managed to find one show that was offensive to her - a local guy named Icky Twerp who introduced the Three Stooges to us on Channel 11 KTVT - he had a show called Slam Bang Theater - (oh the details I can remember!).  We were not allowed to watch.  Well honestly, I wouldn't have wanted to watch but because she was against it - that is exactly what I wanted to see! (Normal kid, huh?)  We watched at the neighbors every chance we got.

Hadn't thought of that in years but it came rushing back when I got an email request from Debby McGillivray late last week saying "My son was looking through all your punched artwork and fell in love. He wants to know if you could do Larry, Moe and Curly from the Three Stooges. He said if anyone can come up with punched ones it would be you".  Her son is 22. 

Girls, I thought the only thing I ever made that a 22 year old guy would care to look at was my 21 year old daughter. (grin)  If this young man cared enough to look at my punch stuff then I sure as heck am gonna punch him some Stooges!


It was harder than I thought - they had so many wild facial expressions!  I hope this captures some of what Debby's son wanted.  It was fun trying.

Moe and Larry - wide oval heads
Curly's head- 1.75 circle
Moe's hair - 1.75 circle
Curly's hair - sponged on
Larry's hair - scallop ovals, re-punched to make smaller
Moe's nose - small Heart to Heart with bumps cut off
Curly's nose - 1/2 inch circle then snipped straight on both sides angling just a little to be smaller on the top
Larry's nose - leaf from Two Step Bird
All eyes are white and black standard hole punch offset so you can see a bit of the white
All eyebrows are slot punch - Moe, cut in half - Curly cut in half again
All mouths are standard hole punch - cut for Larry and Curly
Curly's ears are small Heart to Heart

Now I need to ask my Mom what was "so awful" about the Three Stooges...

Monday, January 11, 2010

Love can sneak up from BEHIND


Doesn’t this rear view of Cupid just CRACK you up? (pun intended)

I grin every time I look at it.

The New Year baby got me thinking I could make Cupid. I started him while playing at my upline’s house but couldn’t remember what kind of hair Cupid had so Jenifer googled some images – lots to choose from –and it turns out Cupid can have lots of different hair styles.

However, one image had Cupid from behind.... So, of course, I had to try a version of that and well, it is all I hoped for.

Not that I spend a lot of time hoping to see cracks, but you know what I mean. The jokes and “suggestions” were flying around the room but I decided to keep this rated PG.

Body is wide oval reinserted into the butterfly punch - insert it from the opening so just one end of the oval is in the side of the butterfly – punch to get his rear cheeks. Then use the mat from the mat pack and an embossing tool to define the crack, add a little pink chalk to define his rear

Legs and arm are like the New Year Baby.

Butterfly wings - Iridescent Ice on the wings (suggested by my ‘glitter queen’ sideline, Eileen)

Snowflake and Heart to Heart for arrows

Word window for quiver

Scallop oval - re-punched to make smaller for hair

The first one I made didn't have the shiny wings or the chalk defined butt cheeks - and I positioned his legs a little differently - here they are side by side


I think I like the one on the left better for the leg out and the arrows spread - and the one on the right for the shiny wings and chalked rear.  Even using punches, nothing ever comes out looking EXACTLY alike.

Are any of you in the Valentine round of the HotSwappingMamas group?  This will be one of the 3D elements I make - sorry, one less surprise for you when your swaps arrive.

Dwarfs still on pause - I will get back to them but I am on Valentine mode for a few days.  Got to get these ideas out to you if you are going to have time to use them!

Sunday, January 10, 2010

Cold then Cozy

First, a little proof that it is COLD here in North Texas
We haven't had precipitation since Wednesday
but I found this icicle on our house Saturday afternoon.
  Brrr....


Now something cozy and warm....

My friend, Jan, gave me this battery operated candle for Christmas - LOVE IT - you don't have to worry about an open flame but still get a great cozy glow and a delicious scent. I started to decorate this for a different project but liked the gingerbread man better than what I planned - and with the heart shaped cheeks I say the gingerbread man still works for Valentines!


Saturday, January 9, 2010

Cold Birds on a Branch

Dwarfs on pause while I share something else.

I was catching up on reading some of the bazillion blogs I like to look at and POOF!  I HAD to make this card. 


The inspiration came from here - Kendra in Tuscon posts lots of fabulous pictures for inspiration on Wednesdays and I have earmarked many of them to come back to "someday" but this one just shouted PUNCHES - make this right now before it is the middle of summer and totally inappropriate! 


My card is not a direct "reenactment" of the t-shirt but I didn't stray too far.  The fourth bird is on the inside. 


Reminds me of our family  - Dad and Mom at home, one little chick about to hop off that branch and one that is basically gone.  I sure am proud of the little chicks I have raised!

But if this really represented our family, I'd have to be the short fatter bird... (scrunched up face here)

I am excited about the holly leaves because I figured out how to make them from punches without having to draw the lines - just my two little paws, the paper and the wide oval punch!  Problem is... I can't really teach it to you with just photos since I need both hands to do it.  If only I knew how to do videos...  and if only I had a tripod....

Learning to do video and learning to put it on the blog is on my list of things to do this year.  Hopefully before we start making Christmas items again, I'll figure it out.

Friday, January 8, 2010

More White Beards - Get your Grump On


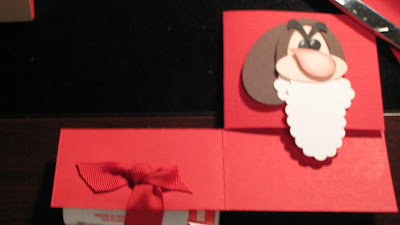
For my "get well basket" project using Grumpy, I decided to include some pain reliever 'for when you are feeling Grumpy'.  I picked up a little sample size pack at the drugstore check out and cleverly attached it to a little card like this:

A slot punch and ribbon - a very low tech solution.
Used red sticky strip to secure this flap to the card base
See photo below:


Here is the scoop on making Grumpy...


Click to see the photo larger and read the words

Chocolate Chip - wide oval (not the large oval shown in the photo), HOLE from a large oval punched with a wide oval to get the hat edge

Blush Blossom - 1 inch circle, leaf from Two Step Bird, Small Oval

White - two Scallop Oval, re-punch one of them as shown, smallest heart from Heart to Heart

Black - two standard hole punch, HOLE from narrow heart in Heart to Heart -->>  move punch up from the hole and punch to get the narrow sliver for eyebrows, toss the black heart and scrap shown in the photo

Sponge Bravo Burgundy ink around the nose
Place the black of the eye at the TOP of the heart - add white highlight with gel pen
Layer beard parts as shown


Almost assembled but gosh, he doesn't look Grumpy yet!  That is because the EYEBROWS are the key to his personality.


 NOW he is grumpy!

Nose is popped up on a dimensional.

I like Grumpy - he may be my fave of the punched dwarfs - I just don't want to look or act like him.  But I guess keeping those eyebrows plucked would make anyone grumpy.  (grin)