I've done Garfield, Felix, and Pink Panther but a request from Marisol of A Touch of Sol asking if I had ever done anything from Dr. Seuss led to this...

His face isn't exactly right, I didn't include his ear or mouth - but I was given some advice to "keep it simple and clean and don't drive yourself crazy" so... he is what he is.
And since I think you will like him even with his flaws, I prepared some "how to" photos.
Punch List
1 inch circle
large oval
small oval
word window
heart to heart
circle from itty bitty punch pack (If you don't have this yet -you can use the tip of the word window)
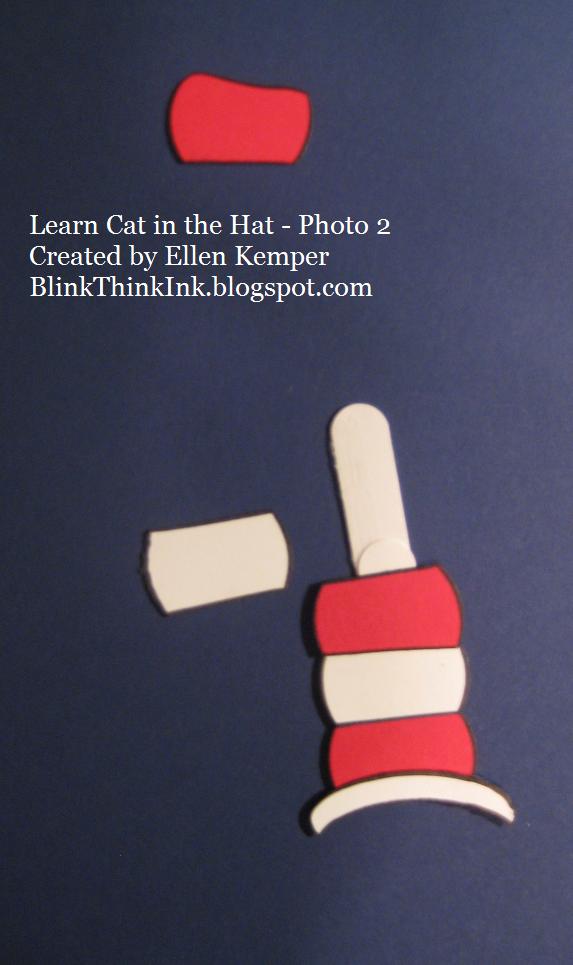
Hat and Bow-tie first:
Neck is half of a word window (sponge with gray ink)
Bow tie is two narrow Heart to Hearts, one small Heart to Heart and the circle from the itty bitty punch pack
I recommend outlining each of these pieces with a black marker
Hat brim is a small oval punched next to a small oval hole (outline in black)
Support pieces to assemble hat - 2 word windows (can be any color)
Hat parts are three red and two white -1 inch circle punches - trim "flattish" on each side - in the photo below I show one of these on a green circle so you can see what I mean - the cuts don't need to be perfectly straight, even or exactly parallel - just relax and cut. (outline in black)

One Large oval and one small oval

Add some gray sponging and outline in black (outline AFTER assembly - you don't want a line all the way around the small oval)

Punch 2 circles from the itty bitty punch pack
Stick them on the sticky part of a post-it note
Repunch as shown in the photo below.


Add a little "u" shape in his eyes with a fine tip maker.
Snip a TINY bit with your circle punch at the corner of a black scrap paper for his nose - this will need to be adhered with glue pen (too small for my preferred mini glue dots)He's ready for a day of play
Alas, there's no more silly rhyme
Because this girl's run out of time
9 comments:
wonderful! thanks for sharing!
Sandra
I love him!
Adorable...even flawed! lol
Hello!
He is exactly right! Love him! You continue to be amazing!
Wishing you well!
Hugs,
Barbara Diane
Great job! I think you captured his face and the hat nails the whole picture. Tks for sharing!
Ellen, I LOVE your punch art! Keep them coming :)
Ellen, you can do it with a Punch
You have based on someone's Hunch
And we know you thought about it all during your Lunch
Munch Munch Munch
Dr. Seuss would be Proud
We all can shout this Out Loud.
Because Ellen you are the greatest
and without you we all would be Stinkin * because we love your ideas*
So please continue on with Blinkin Thinkin and Inkin.
I love what you do, you are so so creative..
Thank you again for being you.
Thank you again
Patricia Ansaldo
PS I don't eat green eggs and Ham.
LOL
Very Creative Patricia!
Ellen...Queen of Punch Art...I bow down to you...I am on my knees...Thank you so much! You ROCK VC Sister...
Marisol Gutierrez
Post a Comment